
A classic fitted wool baseball cap is an iconic wardrobe staple. Known for its structured crown, breathable natural fibers, and timeless aesthetic, a premium wool cap offers a level of comfort that synthetic blends struggle to match.
However, wool is a living fiber. Environmental humidity, head perspiration, ambient temperature, and age can cause a once-perfectly tailored fitted hat to tighten up, leading to discomfort, forehead pressure marks, or tension headaches.
If your favorite fitted cap feels tight, you do not need to replace it or resign yourself to wearing an uncomfortable crown.
Because wool fibers possess unique elasticity and thermo-reactive properties, you can expand a tight fitted baseball cap up to a half-size larger right from home.
This guide breaks down the science behind wool relaxation, details three proven stretching methods, provides crucial safety rules to protect your cap’s structure, and outlines long-term care practices.
The Science of Wool: Why Fitted Caps Shrink and Stretch
Understanding why wool shrinks—and how it can safely stretch—requires a brief look at the structural biology of natural sheep fibers.
Wool fibers are composed of keratin, a complex protein matrix held together by temporary hydrogen bonds and permanent disulfide bonds.
When wool is woven into cap panels and stitched into a sweatband, it holds a specific molecular arrangement.
Why Wool Shrinks: When wool fibers absorb moisture (such as sweat or rain) and are exposed to body heat or friction, the keratin chains curl and contract. As the cap dries, new hydrogen bonds form in this tight, contracted state. Over time, this natural phenomenon causes fitted caps to lose their original circumference.
How Relaxation Works: Introducing mild moisture or gentle steam temporarily breaks these hydrogen bonds without damaging the core protein structure. While the fibers are damp and relaxed, mechanical tension gently realigns the protein strands into an elongated state. As the moisture evaporates completely under stable tension, the hydrogen bonds reset, permanently locking in the expanded size.
Anatomy of a Fitted Baseball Cap: Protecting Key Components
Before applying moisture or tension to a fitted hat, you must understand its mechanical anatomy. Indiscriminate steaming or pulling can ruin the shape of the crown or warp the visor.
The Crown Panels: Typically constructed from six triangular wool cloth panels joined at the top button (squatchee). These panels absorb moisture readily and are designed to give under gentle tension.
The Sweatband: The interior band running along the base of the crown. It bears the brunt of tension during stretching. In vintage or premium wool caps, the sweatband may be made of genuine leather or thick cotton canvas; in modern caps, it is usually a synthetic weave.
The Buckram: The stiff, woven fabric layer fused inside the two front panels of structured caps (like modern game caps) to keep them upright. Excessive moisture can break down the adhesives in the buckram, leading to a sagging front.
The Visor/Brim: Built around an internal stiffener core. In modern caps, this core is high-density plastic, but in vintage caps, it is thick cardboard. Crucial rule: The visor must remain dry to avoid permanent warping, bubbling, or structural failure.
Choosing the Right Approach
Select the stretching technique that aligns best with your available tools, time constraints, and desired expansion level.
Method 1: The Mechanical Hat Stretcher (Recommended)
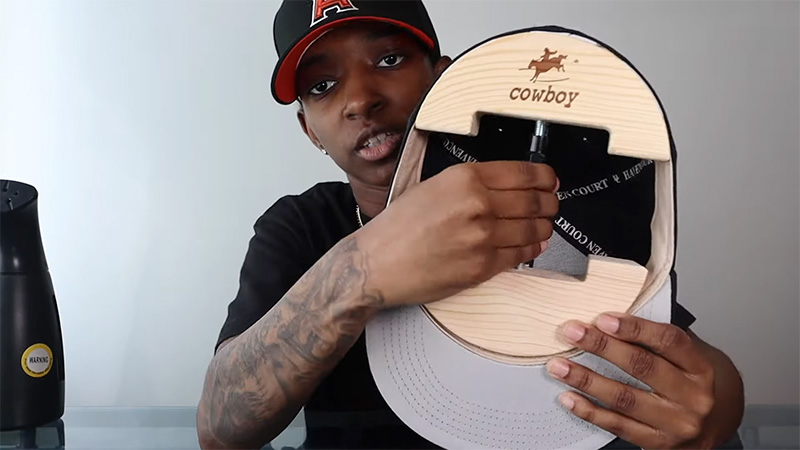
Using a two-way wooden or heavy-duty plastic turnbuckle hat stretcher is the gold standard method used by milliners and professional hat renovators. It provides uniform, controlled pressure without warping the crown or over-stressing individual seams.
Required Equipment
- Two-way turnbuckle hat stretcher tool
- Spray bottle with lukewarm water or a garment steamer
- Clean micro-fiber towel
Step-by-Step Instructions
- Inspect and Clean: Inspect the inner sweatband for dust or salt deposits from sweat. Wipe the interior band with a damp microfiber cloth.
- Apply Targeted Moisture: Spray a fine mist of lukewarm water directly onto the interior sweatband. Alternatively, pass a garment steamer 3 to 4 inches away from the sweatband for 10 to 15 seconds. Keep the steam directed strictly at the lower band, keeping moisture away from the visor.
- Insert the Tool: Collapse the turnbuckle stretcher to its smallest width. Position the contoured wooden blocks inside the crown so they rest flush against the wet sweatband, aligned from front to back (or side to side, depending on where pressure is felt).
- Expand to Tension: Rotate the central turnbuckle handle clockwise. Expand the tool until the wood blocks press firmly against the inner band. Continue turning until you feel firm, solid resistance. Do not force the turnbuckle past natural resistance, as over-cranking can snap panel stitching.
- Set and Dry: Place the hat with the stretcher installed in a cool, dry, well-ventilated room. Allow it to sit undisturbed for 24 to 48 hours.
- Release and Test: Turn the central handle counter-clockwise to release tension. Remove the tool and try on the cap. If additional space is required, repeat the process, increasing tension slightly.
Method 2: The Steam-and-Wear Method (Personalized Fit)
If you need a custom fit that accounts for the specific shape of your skull (such as a round or oval profile), the steam-and-wear method leverages your head as a natural mold.
Required Equipment
- Handheld garment steamer or tea kettle
- Spray bottle with warm water (alternative)
- Dry towel
Step-by-Step Instructions
- Target the Sweatband with Steam: Hold the interior sweatband of the cap over the rising steam of a kettle or 3 inches away from a garment steamer nozzle. Rotate the hat slowly for 20–30 seconds so the entire sweatband becomes warm and damp.
- Check Thermal Comfort: Ensure the band is comfortably warm, not scalding hot, to protect your forehead skin.
- Wear and Shape: Place the damp cap onto your head, pulling it down to your natural wearing depth.
- Natural Drying Period: Keep the cap on your head continuously for 20 to 30 minutes. As your body warmth dries the dampened wool fibers, they conform precisely to the contours of your skull.
- Final Air Dry: Take the cap off and set it on a flat surface or hat stand to allow any remaining ambient moisture to evaporate completely before long-term storage.
Method 3: Household Alternatives (DIY Approaches)
If you do not own a mechanical hat stretcher and prefer not to wear a damp cap, common household objects can serve as effective expansion forms.
The Rolled Bath Towel Technique
- Take a clean, heavy bath towel and fold it lengthwise.
- Roll the towel tightly into a firm cylinder until its outer circumference matches your target hat size. Secure the roll with heavy rubber bands or tape.
- Lightly mist the cap’s inner sweatband with warm water.
- Work the rolled towel cylinder into the crown until the wool fabric becomes taut.
- Leave the towel inside for 24 hours in a well-ventilated space.
The Inflatable Ball Technique
- Insert a deflated youth-size soccer ball, basketball, or small athletic ball inside the crown of the cap.
- Ensure the ball sits level along the interior sweatband line.
- Lightly steam or spray the sweatband with lukewarm water.
- Using a hand pump, slowly inflate the ball inside the cap until the wool panels are smooth and the lower band is under firm tension.
- Leave the ball inflated inside the crown for 12 to 24 hours before deflating and removing.
Essential Best Practices and Pitfalls to Avoid
Stretching natural wool requires a balance of tension, moisture, and drying time. Mistakes can permanently ruin your cap’s shape, shrink the material further, or destroy its structural Integrity.
Critical Rules to Protect Your Cap
- Never Apply Direct High Heat: Avoid hair dryers set on high heat, clothes dryers, ovens, or boiling water. High heat causes keratin fibers to lock into microscopic scales, resulting in permanent, severe shrinkage (felting).
- Protect the Visor from Water: Keep liquid water and concentrated steam away from the bill. If the internal cardboard core absorbs water, it can warp, soften, and lose its curve permanently.
- Avoid Over-Stretching: Never attempt to expand a cap more than one full hat size (e.g., jumping from size 7 to 7 3/8). Pushing beyond natural fiber elasticity can snap the perimeter stitching, pop eyelets, or cause panel distortion.
- Keep Front Buckram Dry: On structured caps, excessive moisture on the inner front panels can dissolve the adhesive backing of the buckram stiffener, causing the front profile to cave in.
Maintenance: Preserving Your Cap’s Size and Shape
Once you have expanded your wool fitted cap to your ideal circumference, proactive storage and maintenance will prevent it from contracting again.
Proper Storage Practices
- Use a Solid Crown Shaper or Stand: Store your cap on a dedicated wooden hat block, plastic crown dome, or head mannequin. Avoid hanging fitted caps on thin wall hooks, which concentrate weight and deform the rear panels.
- Control Ambient Humidity: Store wool caps in a temperature-controlled environment with relative humidity between 40% and 50%. Extreme dryness can make wool brittle, while excessive dampness causes fiber contraction.
- Air Out After Wear: Never toss a sweaty wool cap directly into a closed closet or gym bag. Allow sweat to evaporate fully at room temperature after wearing.
Sweat Management and Spot Cleaning
- Sweat Salt Removal: As sweat evaporates, dissolved body salts collect inside the sweatband. These salts act as a desiccant, absorbing moisture from the air and triggering fiber shrinkage. Wipe the interior sweatband with a damp cloth after long periods of wear.
- Spot Cleaning Wool: If the exterior wool cloth needs cleaning, use a specialized wool cleaner or mild baby shampoo mixed in cold water. Spot clean gently using a soft-bristle brush, rinse with a damp towel, and dry under light mechanical tension (such as a hat jack or towel roll).
Frequently Asked Questions
Can you stretch a wool fitted cap that contains a synthetic blend?
Yes. Many modern baseball caps use a blend of wool and polyester or acrylic. While synthetic fibers do not absorb water in the same way keratin fibers do, heat and steam relax the synthetic weave, allowing the cotton or wool sweatband to expand under mechanical pressure.
How much can you safely stretch a fitted wool cap?
With proper steam and mechanical tension, you can safely expand a wool fitted hat by 1/8 to 1/2 size (for example, moving from a 7 1/4 to a 7 3/8). Attempting to stretch a cap further risks tearing structural seams or deforming the crown geometry.
What should I do if the cap shrinks back after a few weeks?
Wool has a natural shape memory. If a cap contracts over time due to sweat or humidity, simply repeat the process using the Mechanical Stretcher or Steam-and-Wear method. Applying a fabric-safe water-repellent spray to the exterior panels can help prevent ambient moisture absorption.
How do I fix a cap that was over-stretched?
If a cap becomes too loose, lightly mist the outer wool panels (avoiding the brim and sweatband) with warm water and dry it with a household hair dryer set on medium heat. The combination of moisture and gentle heat will cause the wool fibers to contract slightly.
Conclusion
Successfully stretching a wool fitted baseball cap comes down to working with the natural science of the fabric rather than forcing it.
By using controlled moisture, steam, and gradual mechanical tension, you can safely expand a tight crown up to a half-size larger without compromising structural integrity or damaging delicate panel stitching.
Always prioritize gentle air-drying over high heat, keep liquid moisture far away from the brim’s internal core, and store your cap on a dedicated dome form after sizing.
With proper technique and routine maintenance, your favorite wool cap will maintain its tailored, comfortable fit for years.







Fitted hats are a timeless classic. Plus, it suits many outfits and is perfect for casual or sporty attire. But, unfortunately, having a loose baseball cap is such a let-down.