In the competitive landscape of grassroots athletics, few innovations have had as profound an impact as the tape ball.
Originating as a necessity in urban environments where professional leather balls were either too expensive or too dangerous for concrete “pitches,” the tape ball has evolved into a sophisticated tool of sporting precision.
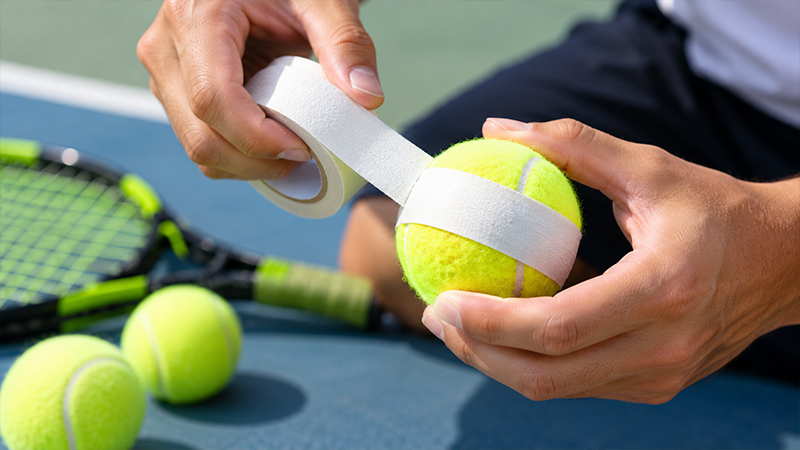
To the uninitiated, it may appear as a simple tennis ball wrapped in electrical insulation. To the professional, it is a carefully engineered projectile designed to mimic the aerodynamics, weight, and unpredictable movement of a professional cricket ball.
Mastering the art of taping a ball is not merely a task of application; it is a discipline that requires an understanding of physics, material science, and the specific needs of the bowler.
The goal is to transform a light, fuzzy tennis ball into a high-performance tool capable of extreme pace and devastating swing.
This guide outlines the professional standard for preparing a ball in under 120 seconds, ensuring your equipment meets the rigorous demands of high-stakes play.
The Cultural Significance of Tape Ball Cricket
Before diving into the technical specifications, it is essential to understand the heritage of this equipment. Tape ball cricket is more than a casual pastime; it is the laboratory where some of the world’s fastest bowlers have honed their craft.
By modifying a standard tennis ball, players can practice at high speeds on hard surfaces without the risk of serious injury associated with the traditional leather ball.
The primary objective of the tape is twofold: weight and texture. A standard tennis ball is too light to travel at high velocities over long distances and is highly susceptible to wind resistance due to its felt surface.
The application of smooth PVC tape provides the weight necessary for momentum and the aerodynamic surface required for the ball to “cut” through the air.
Selecting the Right Equipment
High-performance results start with high-quality materials. Not all tennis balls or tapes are created equal, and the professional understands that material choice directly correlates to the ball’s behavior in flight.
The Core: The Tennis Ball
When selecting a ball for taping, look for “heavy” or “pressurized” tennis balls designed for hard courts. These balls have a denser rubber core that provides a consistent bounce.
- Compression: The ball should have minimal “give” when squeezed. A soft ball will deform upon impact, losing energy and speed.
- Surface Condition: While the tape will cover most of the felt, starting with a ball that has uniform felt density ensures that the tape adheres smoothly without creating air pockets.
The Coating: Electrical Insulation Tape
The gold standard for this process is high-grade PVC electrical insulation tape. Professionals prefer this over duct tape or packing tape for several reasons:
- Elasticity: PVC tape can be stretched during application, allowing it to conform perfectly to the spherical shape of the ball without wrinkling.
- Adhesion: It remains tacky even when subjected to the high heat generated by friction against the pitch.
- Smoothness: The surface of electrical tape is nearly frictionless, which is vital for manipulating airflow to achieve swing.
The 120-Second Technique: A Step-by-Step Blueprint
Efficiency is critical, especially during a match where a ball may need to be replaced quickly. Drawing from the “Juniors Art” methodology, this process focuses on speed without sacrificing the structural integrity of the ball.
Step 1: Creating the Foundation (0:00–0:30)
The first 30 seconds are dedicated to establishing the “seam.” In professional cricket, the seam is the raised stitching that helps the bowler grip the ball and determines its movement off the pitch.
- Locate the natural curvature of the tennis ball’s rubber molding.
- Anchor the tape firmly at the “north pole” of the ball.
- Wrap the tape vertically around the circumference, ensuring it is pulled tight to compress the felt.
- Apply a second layer directly over the first. This creates a subtle ridge that acts as a synthetic seam.
Step 2: Systematic Coverage (0:30–1:30)
Once the seam is established, the objective shifts to covering the “hemispheres” of the ball.
- Starting from the seam, begin wrapping the tape in a slightly overlapping spiral.
- Each new layer should overlap the previous one by approximately 2 to 3 millimeters. This prevents the tape from peeling back during the high-stress moment of impact.
- Maintain constant tension. If the tape is loose, it will create “bubbles” that disrupt the ball’s flight path and cause it to wobble unpredictably.
- Ensure that one half of the ball is covered with absolute smoothness. This is the “shiny side” that will interact with the air to move.
Step 3: The Finishing Lock (1:30–2:00)
The final 30 seconds are the most important for the ball’s longevity.
- The end of the tape should always be cut with a sharp tool rather than torn. A torn edge is jagged and prone to lifting.
- The final anchor point should be placed along the seam. This ensures that the centrifugal force of the ball’s rotation keeps the tape edge pressed down rather than pulling it away.
- Press the ball firmly between your palms and rotate it. The heat from your hands will help activate the adhesive, creating a more permanent bond between the tape and the felt.
The Physics of Performance: Why Taping Works
To excel as a player, one must understand why these modifications work. The performance of a tape ball is governed by the principles of fluid dynamics—specifically, how air moves around a sphere.
Aerodynamic Asymmetry
In professional play, bowlers use a technique known as “swing.” This occurs when there is a pressure difference between the two sides of the ball. By taping a ball smoothly, you reduce the surface roughness.
When a bowler releases the ball with the seam angled, the air travels faster over the smooth taped surface than over the slightly textured side.
According to Bernoulli’s principle, faster-moving air creates lower pressure, causing the ball to “swing” or curve toward the low-pressure side.
Weight and Momentum
A standard tennis ball weighs approximately 56–59 grams. A fully taped ball can increase this weight by 10 to 15 percent. This added mass is crucial for maintaining velocity.
A heavier ball has more inertia, meaning it is less affected by air resistance (drag) and maintains its speed longer through the air and after hitting the pitch.
The “Half-Tape” Variation
For advanced players, the “half-tape” method is a specialized strategy. By leaving one side of the tennis ball exposed (fuzzy) and taping the other side perfectly smooth, the bowler creates extreme aerodynamic asymmetry.
This often results in “reverse swing,” where the ball moves in the opposite direction of what the batsman expects, making it one of the most difficult deliveries to counter in the game.
Advanced Strategies for Competitive Play
A perfectly taped ball is only as good as the player using it. Once you have mastered the 120-second application, you must adapt your playing style to the equipment’s unique characteristics.
The Bowler’s Grip
Because the PVC tape can be slippery, especially if the player’s hands are perspiring, the grip must be adjusted. Professionals often use the “two-finger” grip, where the index and middle fingers are placed directly on the synthetic seam created during Phase 1.
This allows for maximum “purchase” on the ball, enabling the bowler to impart the revolutions necessary for spin and swing.
Pitch Interaction
On a hard concrete or asphalt surface, a taped ball will “skid” faster than a leather ball. The smooth surface of the tape minimizes friction upon impact, allowing the ball to maintain a higher percentage of its pre-bounce velocity.
Bowlers should aim for “good length” deliveries that force the batsman to play on the rise, where the speed and skid are most difficult to manage.
Maintenance and Longevity: Protecting Your Equipment
Even a masterfully prepared ball has a limited lifespan. The high-velocity impacts against the bat and the pitch will eventually cause the tape to degrade.
- Check for “Scuffing”: After several overs, the smooth surface of the tape will become scuffed. While this can actually help with certain types of swing, excessive damage will cause the ball to lose its aerodynamic balance.
- Edge Lifting: If the tape begins to peel at the edges, it must be repaired immediately. A lifting edge can act as a “flap” in the air, creating massive drag and making the ball slow and easy to hit.
- Adhesive Failure: In extreme heat, the adhesive on the tape can become “gooey,” leading to a messy grip and inconsistent flight. If the tape starts to slide around the core of the ball, it is time for a fresh application.
Conclusion
Taping a tennis ball is a bridge between the casual and the professional. It is a testament to the ingenuity of players who refuse to let environmental constraints limit their competitive spirit.
By following this professional blueprint—selecting high-grade materials, applying the “Juniors Art” 120-second method, and understanding the underlying physics—you ensure that every delivery you bowl is a product of precision engineering.
In the world of tape ball cricket, the quality of your equipment is a reflection of your respect for the game. A well-taped ball doesn’t just perform better; it demands a higher level of skill from both the bowler and the batsman.
Whether you are playing on the streets of Karachi or a parking lot in New York, the principles of the perfect tape ball remain the same: speed, balance, and the relentless pursuit of the perfect delivery.