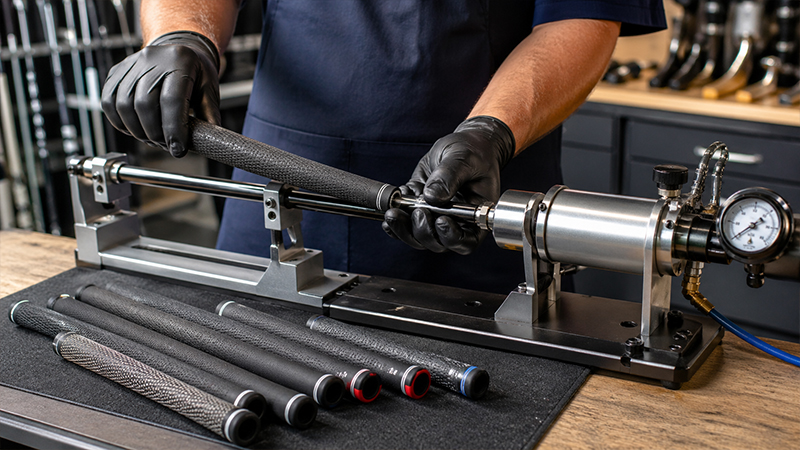
For the dedicated golfer, the equipment is more than just a set of tools; it is an extension of the self. However, the cost of maintaining that equipment—specifically the frequent need to change grips due to wear or preference—can become a significant annual expense.
Traditional methods of grip removal involve a hook blade and the destruction of the old grip. But what if you could “float” your grips off, preserving them for future use or resale?
Enter the world of pneumatic golf grip removal. This professional-grade technique utilizes pressurized air to break the adhesive bond between the grip and the shaft, allowing the grip to slide off intact.
Whether you are a club-building enthusiast or a golfer looking to optimize your maintenance budget, mastering this process is a game-changer.
In this comprehensive guide, we will explore the elite strategies for pneumatic removal, ensuring you meet Fortune 500 standards for efficiency, safety, and equipment preservation.
The Economics of Preservation: Why Air is the Professional’s Choice
The primary driver behind the shift toward pneumatic removal is preservation. In a standard retail environment, a club technician will typically cut off your old grips.
This is fast, but it is wasteful. By using an air compressor, you essentially “float” the grip off the shaft.
This method is highly popular among players who like to experiment with different grip styles or those who need to save a set of expensive grips from a set of shafts they are selling.
By following the pneumatic path, you transform a disposable component into a reusable asset.
The Essential Toolkit: Setting Up Your Professional Bay
To execute this task with precision, you must go beyond basic household tools. The following equipment is non-negotiable for a professional setup:
The Air
You do not need an industrial-sized tank to get the job done. A small pancake compressor or even a high-quality tire inflator can provide the necessary pressure. The key is consistency and control rather than raw volume.
Precision Nozzles
Professionals recommend:
- Tapered Tips: These provide a snug fit against the vent hole.
- Ball Inflator Needles: These can be inserted directly into the vent hole at the butt end of the grip to create a perfect seal.
The Safety Sleeve: Your Most Important Component
Safety is the hallmark of professional work. When you inject high-pressure air into a rubber tube (the grip), it wants to expand. Without containment, the grip can “balloon” or even explode.
- The Solution: Slide a PVC pipe (approximately 1.25”–1.5” in diameter) or a heavy-duty cardboard tube over the grip before applying air. This sleeve restricts expansion and forces the air to travel down the length of the shaft instead of outward.
Vise and Shaft Protector
Never attempt this while holding the club by hand. Secure the club firmly in a vise using a rubber shaft protector. This prevents the club from rotating or slipping, which could lead to shaft damage or personal injury.
The Step-by-Step Removal Process
Following a standardized operating procedure ensures repeatable success and minimizes the risk of damaging your grips.
Step 1: Secure the Club
Place the club horizontally in your vise. Ensure the rubber protector is positioned correctly to avoid crushing carbon fiber or scratching steel shafts.
Step 2: The Safety Check
Slide your safety sleeve over the grip. This is the step most often skipped by amateurs, and it is the most frequent cause of ruined grips or minor injuries. Always use a sleeve, especially for grips installed with permanent glue or those with old, dry tape.
Step 3: Calibration of Pressure
Set your compressor to a range between 30 and 50 PSI. While it may be tempting to “crank it up” for a stubborn grip, going higher than 60 PSI significantly increases the risk of damaging the grip material or causing a blowout.
Step 4: Solvent Injection (The “Taped” Scenario)
If the grip was originally installed using traditional double-sided tape and solvent, it may be stubborn. In these cases, squirt a small amount of grip solvent into the vent hole first. This helps lubricate the old adhesive before you introduce the air.
Step 5: The “Pneumatic Float”
Insert your nozzle into the vent hole. Instead of one long, continuous blast of air, apply short, quick bursts. This creates a pulsing effect that gradually breaks the bond of the tape.
Step 6: Twist and Pull
While the air is pulsing, use your free hand to gently twist the grip and pull it toward the head of the club. Once the air reaches the bottom of the grip, the friction is eliminated, and the grip should slide off the end of the shaft with ease.
Material Science: Understanding Grip Variations
Not all grips respond to air in the same way. A professional must adjust their technique based on the material and construction of the grip.
Corded Grips
Corded grips contain integrated fabric fibers that provide extra traction. However, these fibers make the grip less flexible.
Because they don’t stretch as easily as pure rubber, they are more prone to “ballooning” at weak or worn spots. Extra care and a tight-fitting safety sleeve are mandatory here.
Putter Grips
Putter grips present a unique challenge. Many feature thick, soft walls or specialized “pistol” shapes. These geometries make it significantly harder to remove with air without stretching the material out of shape.
If you are removing a high-end putter grip, proceed with extreme patience and lower PSI settings to maintain its ergonomic integrity.
Troubleshooting and Pro-Tips
Even with the best equipment, you may encounter obstacles. Here is how the pros handle them:
- Stubborn Adhesive: If the air won’t travel down the shaft, the tape may be too dry. Adding more solvent and letting it sit for 60 seconds before reapplying air is often the solution.
- The “Balloon” Effect: If you see the grip starting to swell despite the sleeve, stop immediately. Check your PSI and ensure your sleeve is the correct diameter.
- Cleaning the Inner Core: Once the grip is removed, the inside will likely be coated in old adhesive or solvent. To make it reusable, professionals use a long brush and a bit of solvent to clean the inner bore, ensuring the next installation is clean and secure.
Enhanced FAQ: Expertise-Driven Insights
Q: Can I use a tire inflator from my car?
A: Yes, many modern tire inflators can reach the 30-50 PSI required for this task. However, ensure it has a nozzle attachment that can create a seal against the grip’s vent hole.
Q: Is it safe to remove grips from graphite shafts using air?
A: Absolutely. In fact, air removal is often safer for graphite shafts than using a hook blade, which carries the risk of scoring or cutting the carbon fibers. Just ensure the vice pressure is properly regulated with a rubber protector.
Q: Why is my grip exploding even with a sleeve?
A: This usually happens if the PSI is too high (over 60 PSI) or if the grip is old, dry, and brittle. Always inspect the grip for cracks or “dry rot” before attempting pneumatic removal.
Q: How do I reinstall a grip using air?
A: The process is essentially the reverse. Apply a small amount of solvent to the tape (if using) or the inside of the grip, then use the air nozzle to “float” the grip back onto the shaft.
Conclusion: Elevating Your Game
Mastering pneumatic golf grip removal is a hallmark of the sophisticated golfer. It represents a commitment to equipment longevity, cost-efficiency, and technical skill.
By utilizing the proper tools—specifically the safety sleeve and regulated air pressure—you can maintain your clubs to a professional standard.
The ability to swap grips seasonally or test new textures without the financial penalty of destroying your current set gives you a competitive edge. It is time to stop cutting and start floating.