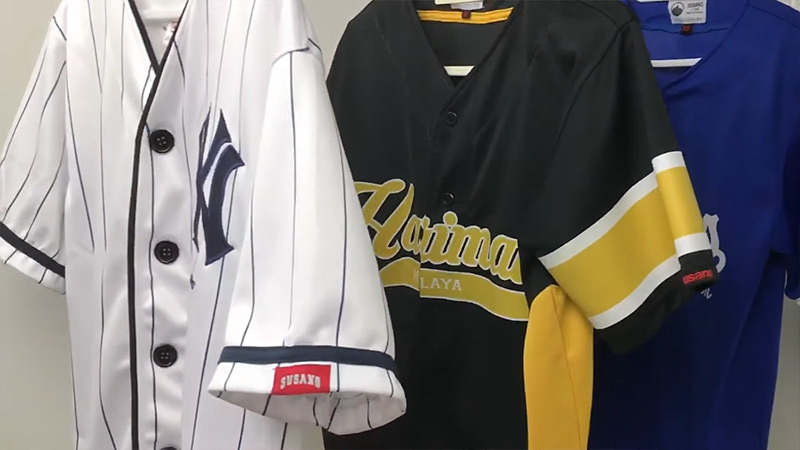
Baseball jerseys are not only a symbol of team spirit but also serve as a canvas for displaying various patches.
Whether you want to showcase team logos, honor special events, or support charitable causes, adding patches to your baseball jersey can enhance its visual appeal.
This guide will walk you through the process of putting a patch on a baseball jersey, covering both iron-on and sewing methods.
So, let’s dive in and explore the step-by-step process to ensure your patches are securely and neatly attached. So, go through the whole article without missing anything.
Rules for Uniform Patch Placement in Baseball
Before we delve into the process of attaching patches, it’s essential to understand the standard rules for patch placement in baseball uniforms. These rules ensure consistency and uniformity across teams.
Here are the guidelines for patch placement on baseball jerseys, ensuring that the patches are positioned correctly:
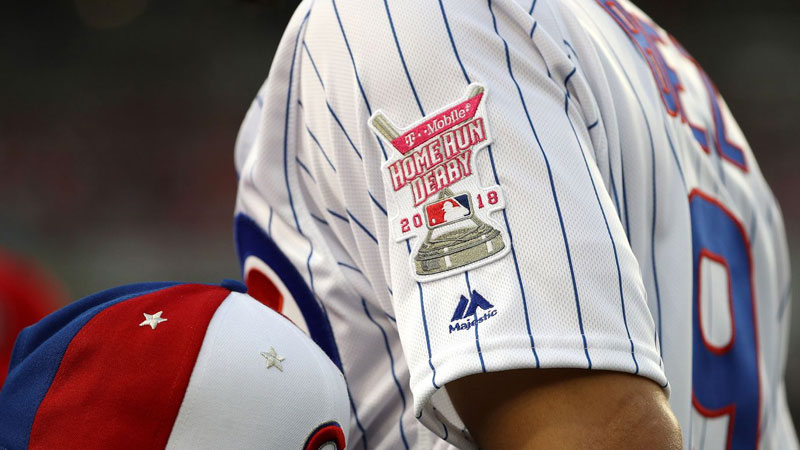
Sleeve Placement
The 2 types are mentioned below. Check them out now.
Raglan Sleeve
When dealing with jerseys that have raglan sleeves, the patch should be positioned 3 inches below the left shoulder seam. This placement allows for optimal visibility while maintaining balance and aesthetics.
Set-in Sleeve
For jerseys with set-in sleeves, the patch should be positioned 1 inch below the left shoulder seam. This placement ensures that the patch remains visible without interfering with the range of motion during gameplay.
Sleeveless Placement
For sleeveless jerseys, the patch should be placed over the left breast area. This positioning allows the patch to be prominently displayed on the front of the jersey, showcasing team affiliation or important logos.
Umpire Patch
In the case of umpires, their jerseys typically feature set-in sleeves. For umpires wearing such jerseys, the umpire patch is usually placed 4 inches below the left shoulder seam.
This specific positioning distinguishes the umpire from the players and contributes to the overall uniformity and professionalism on the field.
Now that we have familiarized ourselves with the rules and guidelines for patch placement on baseball jerseys, let’s proceed to the steps involved in attaching a patch to a baseball jersey.
How to Put a Patch on a Baseball Jersey?
The steps to put a patch on a baseball jersey are discussed in the following section below.
Step 1: Choosing the Right Patch
The first step is to select the patch you want to attach to your baseball jersey. Choose a patch that represents your team, commemorates an event, or showcases your personal style. Ensure that the patch is of high quality and durable.
Step 2: Select the Right Place to Set
Once you have your patch, decide on the placement location based on the type of jersey you have. Refer to the rules mentioned earlier to determine the appropriate position for your patch.
This will ensure that your jersey remains compliant with the standard guidelines.
Step 3: Clean the Place
Before attaching the patch, it’s crucial to clean the area where it will be placed. Use a mild detergent or rubbing alcohol to remove any dirt, oils, or residues that might hinder the patch from adhering properly. Allow the area to dry completely.
Step 4: Place the Patch
For iron-on patches, carefully position the patch on the desired spot of the jersey. Ensure it is centered and aligned properly. Take your time to achieve the desired placement before moving on to the next step.
Step 5: Iron on the Patch
To attach the patch securely, you will need an iron. Set the iron to the appropriate heat setting for the fabric of your jersey. Place a thin cloth or parchment paper over the patch to protect it and the surrounding fabric.
Apply firm pressure with the iron on the patch and move it in a circular motion for about 20-30 seconds. Allow the area to cool down before checking the adhesion.
How to Sew a Patch on a Baseball Jersey?
Source: bleedcubbieblue.com
While iron-on patches are quick and convenient, sewing patches onto baseball jerseys can provide a more permanent and secure attachment.
If you prefer the sewing method, here’s a detailed guide on how to sew a patch onto your baseball jersey:
Step 1: Gather the Necessary Supplies
Before you begin sewing a patch onto your baseball jersey, gather all the necessary supplies. You will need:
Patch
Choose the patch you want to attach to your jersey, ensuring it matches your style, represents your team, or signifies a special event.
Needle
Select a needle appropriate for the fabric of your jersey. A sharp needle with a small eye is ideal for most jerseys.
Thread
Choose a thread color that matches both the patch and the jersey fabric. This will help ensure a seamless and discreet finish.
Thimble
Consider using a thimble to protect your finger while sewing. This can prevent discomfort and potential injuries from needle pricks.
Step 2: Position the Patch on the Jersey
Once you have your supplies ready, position the patch on the jersey according to the rules mentioned earlier for patch placement. Use pins to temporarily hold the patch in place, ensuring it is centered and aligned correctly.
This will give you an idea of how the final placement will look before you start sewing.
Step 3: Thread the Needle and Tie a Knot
Thread the needle with the matching thread and tie a knot at the end. Ensure the knot is secure but not too bulky, as it may create visible bumps under the patch.
Step 4: Insert the Needle through the Fabric and Patch
Starting from the inside of the jersey, insert the needle through the fabric and the edge of the patch. Pull the thread gently until the knot is snug against the fabric. This will anchor your thread securely.
Step 5: Sew Around the Edge of the Patch
Using either a straight stitch or a whip stitch, begin sewing around the edge of the patch. A straight stitch involves passing the needle in and out of the fabric, creating a continuous line of small, even stitches.
A whip stitch involves passing the needle over the edge of the patch and through the fabric, creating a series of loops.
Ensure that you pierce both the fabric of the jersey and the patch with each stitch. This will provide a strong and secure attachment. The stitch length and spacing can vary depending on your preference and the size of the patch.
Step 6: Complete the Circumference of the Patch
Continue sewing around the edge of the patch until you have completed the entire circumference. Take your time and maintain even stitches to ensure a neat and professional finish. When you reach the starting point, make a few additional stitches to secure the thread.
Step 7: Knot the Thread and Trim the Excess
To secure the thread, make a knot on the inside of the jersey, close to the patch. Trim any excess thread, ensuring it is not visible from the front of the jersey. Be careful not to cut the thread too close to the knot, as it may come undone.
With these steps, you can confidently sew a patch onto your baseball jersey, creating a permanent and visually appealing attachment that will withstand regular use and washing.
Why Do Baseball Players Put a Patch on Their Jersey?
Baseball players often put patches on their jerseys for a variety of reasons. Here are a few common motivations for adding patches to baseball jerseys:
Team Pride
Patches showcasing team logos or emblems are a way for players to display their pride and loyalty to their team. It creates a sense of unity and identity among teammates.
Commemoration
Patches can commemorate special events such as championship wins, milestone achievements, or honoring teammates or coaches. They serve as a lasting reminder of significant moments in a player’s career or the team’s history.
Fundraising and Awareness
Baseball teams may wear patches to raise funds or increase awareness for charitable causes or community initiatives. By displaying patches representing charitable organizations or events, players contribute to a greater cause.
Memorialization
Patches can be used to remember and honor loved ones, teammates, or influential figures who have passed away. They serve as a tribute and keep the memory alive within the team and the baseball community.
Sponsorship
Patches can also display the logos or names of sponsors who support the team financially or provide equipment and resources. It helps build relationships between teams and sponsors while showcasing their partnership.
By adding patches to their jerseys, baseball players express their individuality, promote teamwork, and contribute to the rich tradition and culture of the sport.
FAQs
Can I remove an iron-on patch from a baseball jersey?
Yes, you can remove an iron-on patch from a baseball jersey. Use a heat source such as an iron or a hairdryer to heat the patch gradually and peel it off gently. Clean any residue with rubbing alcohol.
Will sew a patch damage my baseball jersey?
When done carefully, sewing a patch onto a baseball jersey should not cause significant damage. Use a needle appropriate for the fabric and sew with small, discreet stitches to minimize any visible marks.
How can I ensure the patch stays in place after washing the jersey?
If you have ironed on the patch, make sure to follow the manufacturer’s instructions regarding washing and drying. For sewn patches, reinforce the stitching by sewing around the edges of the patch again after washing.
Can I attach multiple patches to my baseball jersey?
Yes, you can attach multiple patches to your baseball jersey. Make sure to plan the placement carefully, considering the size and spacing between patches for a visually appealing result.
Can I attach patches to a jersey made of synthetic fabric?
Yes, patches can be attached to jerseys made of synthetic fabric. However, check the patch manufacturer’s instructions to ensure compatibility with the fabric and adjust the iron’s heat setting accordingly.
Bottom Line
Attaching patches to a baseball jersey allows you to personalize your attire and express your allegiance to a team or cause.
Whether you choose the iron-on or sewing method, following the proper steps ensures a secure and professional attachment. Remember to adhere to the uniform patch placement rules to maintain consistency and comply with baseball regulations.
With the information provided in this guide, you can confidently put patches on your baseball jersey, adding a touch of customization and style to your game-day outfit. Best wishes.


