Cross-country skiing is a beloved winter sport that offers both a rigorous workout and an opportunity to immerse oneself in the serene beauty of snow-covered landscapes. Central to this sport’s performance and safety is the proper mounting of cross-country ski bindings.
Whether you’re a seasoned skier seeking an equipment upgrade or a beginner ready to embark on this invigorating journey, understanding how to correctly mount cross-country ski bindings is paramount.
In this comprehensive guide, we will explore the intricate process of mounting these bindings with precision and care. From selecting the right position on your skis to avoiding common pitfalls and ensuring compatibility, we will provide you with the knowledge and tips needed to execute this crucial task effectively.
What Is Cross Country Ski Bindings?
Cross-country ski bindings are crucial components of cross-country skiing equipment that connect the skier’s boots to the skis. They play a pivotal role in providing control, stability, and power transfer while skiing.
Cross-country ski bindings come in various styles, including classic and skate bindings, each tailored to specific skiing techniques.
Classic bindings allow for a forward-and-backward motion of the skis, mimicking a natural walking or running stride. They secure the front part of the boot while allowing the heel to lift off the ski during the glide phase.
Skate bindings, on the other hand, offer lateral support and restrict heel movement to facilitate the side-to-side skating motion characteristic of skate skiing.
Bindings also differ in terms of compatibility with ski boots, with some designed for NNN (New Nordic Norm) systems, while others are compatible with SNS (Salomon Nordic System) or Prolink boots.
Properly selected and adjusted bindings are essential for an enjoyable and efficient cross-country skiing experience.
Types of Cross Country Ski Bindings
Cross-country ski bindings come in several types, each designed for specific skiing styles and boot compatibility. Three of the most common types are Three-Pin, SNS (Salomon Nordic System), and NNN (New Nordic Norm). Let’s explore each of these bindings in more detail:
Three-Pin Bindings
- Three-pin bindings are a traditional and classic choice for cross-country skiing, particularly in the realm of backcountry and telemark skiing.
- They consist of three metal pins on the binding plate, which align with holes in the sole of compatible boots.
- Three-pin bindings provide a secure and reliable connection between the boot and ski, offering good control over the skis.
- These bindings are well-suited for rugged terrain and off-trail skiing due to their stability and durability.
- However, they are less common today, as newer binding systems offer more convenience and versatility.
SNS (Salomon Nordic System) Bindings
- SNS bindings are a popular choice for classic cross-country skiing and are known for their ease of use and efficient power transfer.
- They come in two main subtypes: SNS Profil and SNS Pilot. SNS Profil uses a single metal bar at the toe of the boot to secure it to the binding, while SNS Pilot has two bars for enhanced stability.
- SNS bindings are compatible with a wide range of Salomon boots designed specifically for this system.
- These bindings offer good control during the kick and glide phases of classic skiing and are known for their stability on groomed trails.
NNN (New Nordic Norm) Bindings
- NNN bindings have gained popularity as a versatile and widely compatible option for both classic and skate skiing.
- They feature two grooves on the binding plate that align with corresponding bars on the boot sole. This two-bar system provides stability and control.
- NNN bindings are compatible with boots from various manufacturers, including Alpina, Fischer, Rossignol, and others, making them a versatile choice for skiers.
- They are known for their user-friendly design, easy step-in and step-out functionality, and efficient power transfer.
- NNN bindings are commonly found on modern cross-country skis, especially those designed for recreational and groomed trail skiing.
When choosing cross-country ski bindings, it’s crucial to consider your skiing style, terrain preferences, and boot compatibility. Each of these binding types has its advantages, and selecting the right one can greatly enhance your skiing experience.
Additionally, ensure that your boots are compatible with the chosen binding system to ensure a secure and efficient connection between your feet and skis.
How To Mount Cross Country Ski Bindings?
Mounting cross-country ski bindings is a precise process that requires careful attention to detail. It’s important to follow manufacturer instructions and, if you’re not comfortable doing it yourself, consider having a professional technician at a ski shop perform the mounting for you.
Here’s a general guide on how to mount cross-country ski bindings:
Tools and Materials
- Cross-country skis with pre-drilled holes for bindings (most modern skis have these).
- Cross-country ski bindings.
- Appropriate screws (typically provided with the bindings).
- Screwdriver or screw gun with a torque limiter.
- Marker or pencil.
- Ruler or measuring tape.
Binding mounting template (often included with bindings or available online).
Steps
Select Binding Placement
Determine the correct placement for your bindings. This varies depending on your skiing style (classic or skate), skiing ability, and personal preference. The location should be marked on the ski with a pencil or marker. You can refer to your binding manual or consult with a professional for guidance.
Position the Template (if available)
If you have a binding mounting template, align it with the marked position on the ski. Templates provide precise hole placement for your bindings.
Mark Hole Locations
If you don’t have a template, use a ruler or measuring tape to ensure equal distances between the holes. Measure and mark the positions where the screws will go for the toe and heel pieces of the binding.
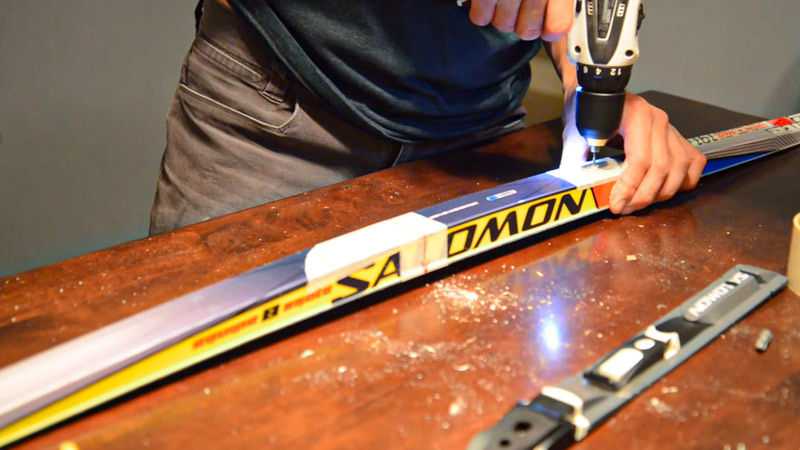
Pre-drill Holes
Using a drill bit slightly smaller in diameter than the screws, carefully pre-drill holes at the marked positions. This helps prevent the ski from splintering when you insert the screws.
Attach the Bindings
Line up the binding holes with the pre-drilled holes in the skis. Ensure the toe piece aligns correctly with the toe of your boot, and the heel piece is in the right place for your boot size.
Insert the screws into the holes and use a screwdriver or screw gun with a torque limiter to secure the bindings. Be cautious not to overtighten the screws, as this can damage the ski or strip the holes.
Check Alignment
Double-check that the bindings are correctly aligned with the marks and that they are securely fastened. Make any necessary adjustments.
Repeat for the Other Ski
Follow the same process for the other ski, ensuring that both bindings are symmetrically mounted.
Final Adjustments
Once both bindings are mounted, verify that the boot fits snugly and comfortably in the bindings. Make any necessary adjustments to the binding settings (e.g., forward pressure, binding tension) according to the manufacturer’s instructions and your skiing preferences.
Remember that mounting cross-country ski bindings requires precision and attention to detail.
If you have any doubts or lack experience, it’s advisable to seek the assistance of a professional ski technician to ensure your bindings are mounted correctly and safely. Properly mounted bindings are essential for your safety and the efficiency of your skiing experience.
Process of Remounting Ski Bindings
Remounting ski bindings is a task best left to professionals, as it involves potentially drilling new holes in your skis, which can affect their structural integrity if not done correctly.
However, if you have a good reason to remount your ski bindings (e.g., changing boot sizes, or adjusting ski performance), here’s a general outline of the process:
Tools and Materials
- Cross-country skis with existing bindings.
- Cross-country ski bindings (if replacing old ones).
- Appropriate screws (typically provided with the bindings).
- Screwdriver or screw gun with a torque limiter.
- Marker or pencil.
- Ruler or measuring tape.
Steps
Assess the Need for Remounting
Determine why you need to remount the bindings. Common reasons include changing boot sizes, adjusting binding placement for performance reasons, or replacing old bindings.
Remove the Old Bindings (if applicable)
If you are replacing existing bindings, carefully remove them from the ski by unscrewing the screws. Be gentle to avoid damaging the ski or the old bindings.
Prepare the Skis
Inspect the skis for any damage, particularly around the old screw holes. If there’s any significant damage, it may not be safe to remount the bindings, and it’s best to consult a professional technician.
Fill any old screw holes with epoxy or wood filler if they are no longer needed. Allow the filler to dry completely.
Determine New Binding Placement
Decide on the new binding placement based on your requirements, whether it’s for a different boot size or for improved ski performance. Measure and mark the new positions for the binding holes on the ski using a ruler or measuring tape.
Pre-drill Holes
Using a drill bit slightly smaller in diameter than the screws, pre-drill holes at the marked positions. This is essential to prevent the ski from splintering when you insert the screws.
Attach the New Bindings (or Existing Ones)
Line up the new binding holes with the pre-drilled holes in the skis. Make sure the toe piece aligns correctly with the toe of your boot, and the heel piece is in the right position.
Insert the screws into the holes and use a screwdriver or screw gun with a torque limiter to securely fasten the bindings. Avoid overtightening the screws.
Check Alignment
Verify that the bindings are correctly aligned with your marks and that they are securely attached to the ski.
Final Adjustments
Once both bindings are mounted, ensure that your boots fit snugly and comfortably in the bindings. Make any necessary adjustments to the binding settings (e.g., forward pressure, binding tension) according to the manufacturer’s instructions and your skiing preferences.
Remember that remounting ski bindings should be done with great care and precision. If you have any doubts or lack experience, it is strongly recommended to seek the assistance of a professional ski technician, as they have the expertise and tools to ensure the job is done safely and accurately.
Incorrectly mounted bindings can compromise your safety and the performance of your skis.
Mistakes to Avoid While Mounting Cross Country Ski Bindings
Mounting cross-country ski bindings requires precision and attention to detail. Making mistakes during the process can compromise your safety and the performance of your skis. Here are some common mistakes to avoid when mounting cross-country ski bindings:
Incorrect Binding Placement
Failing to accurately mark and measure the desired binding placement on your skis can lead to problems with balance, control, and ski performance. Always double-check the alignment and positioning of the bindings before drilling any holes.
Overtightening Screws
Over-tightening binding screws can damage the ski’s core and weaken the ski. Use a screwdriver or screw gun with a torque limiter to ensure the screws are tightened to the manufacturer’s recommended torque specifications.
Using the Wrong Screws
Using screws that are too long or too short can be problematic. If they’re too long, they might penetrate through the ski base, affecting glide. If they’re too short, they may not provide a secure connection. Always use the screws recommended by the binding manufacturer.
Skipping Pre-Drilling
Failing to pre-drill holes before inserting screws can cause the ski to splinter or crack, especially if you’re mounting bindings on wooden skis. Pre-drilling helps create clean, precise holes for the screws.
Not Checking Ski Compatibility
Ensure that your skis are compatible with the type of binding you plan to mount. Some skis are designed for specific binding systems, and using the wrong bindings can lead to compatibility issues.
Neglecting Boot Compatibility
Make sure that the boots you plan to use with the bindings are compatible. Different bindings are designed for specific boot sole profiles, so check for compatibility between the binding and boot type (e.g., NNN, SNS).
Ignoring Binding Settings
Not adjusting binding settings according to your weight, skiing ability, and style can affect your performance and safety. Follow the manufacturer’s guidelines for setting release tensions, forward pressure, and other settings.
Skipping Professional Help
If you’re uncertain about any aspect of mounting bindings, it’s advisable to seek the assistance of a professional ski technician. They have the experience and tools to ensure a safe and accurate installation.
Not Considering Boot Size Changes
If you anticipate changes in your boot size, such as growing children or shared equipment, plan for this when mounting bindings. Consider adjustable bindings or consult a technician for guidance.
Neglecting Ski Inspection
Before mounting or remounting bindings, thoroughly inspect your skis for any damage, including delaminations, cracks, or deep scratches. Damaged skis may not be safe for mounting.
Rushing the Process
Take your time when mounting bindings. Rushing can lead to errors and misalignments. Follow the manufacturer’s instructions carefully and double-check your work.
Not Testing Bindings
After mounting, it’s essential to test the bindings to ensure they release correctly and that your boots fit securely. A binding release check is crucial for safety.
By avoiding these common mistakes and following proper procedures, you can ensure that your cross-country ski bindings are mounted correctly, providing you with a safe and enjoyable skiing experience. If in doubt, consult a professional ski technician for assistance.
Tips for Cross Country Ski Binding Adjustment
Adjusting cross-country ski bindings is essential for achieving optimal performance, comfort, and safety while skiing. Here are some tips for adjusting cross-country ski bindings:
Refer to Manufacturer Guidelines
Always start by consulting the manufacturer’s guidelines and instructions for your specific binding model. These guidelines will provide you with essential information about the binding’s adjustment options and recommended settings.
Determine Your Skiing Style
Consider whether you primarily engage in classic or skate skiing, as different styles may require different binding adjustments. Classic skiing usually requires a more forward position for better kick and glide, while skate skiing might benefit from a more centered position for improved stability and power.
Check Your Boot Size
Ensure that your ski boots are the correct size and fit snugly within the bindings. If you change boot sizes or have different boots for different seasons, you’ll need to readjust your bindings accordingly.
Ski Ability and Experience
Your skiing ability and experience level can influence your binding settings. Novices might prefer looser settings for easier release, while advanced skiers may want a firmer hold for better control and power transfer.
Skiing Conditions
Consider the conditions you’ll be skiing in. Softer snow might require a looser binding setting to prevent unintentional release, while firmer snow may benefit from tighter settings for better control.
Weight and Body Size
Your weight and body size play a role in determining the binding’s release tension. Heavier skiers often need firmer settings to prevent accidental releases, while lighter skiers may prefer lighter tension for easier release.
Experiment Gradually
It’s a good practice to make small adjustments and test your bindings on the trail. Start with a neutral or recommended setting and make slight changes as needed, paying attention to how they affect your skiing performance.
Forward Pressure
Check and adjust the forward pressure setting, which is critical for ensuring your boot stays securely engaged with the binding. Incorrect forward pressure can lead to premature release or difficulty stepping in and out of the binding.
Binding Heel Cup
Ensure that the binding heel cup is adjusted to fit the contour of your boot’s heel properly. This helps maintain a secure connection between your boot and binding.
Regular Maintenance
Periodically inspect your bindings for wear and tear, including the condition of screws, bindings, and springs. Replace any damaged or worn components to maintain reliable performance.
Safety Release Test
Conduct a safety release test to ensure that your bindings release appropriately when needed. Follow the manufacturer’s instructions for this test, which typically involves a controlled lateral or diagonal twist to simulate a fall.
Seek Professional Help
If you’re unsure about adjusting your bindings or are dealing with complex issues, it’s advisable to consult a professional ski technician or shop. They have the expertise and equipment to make precise adjustments.
Remember that proper binding adjustment is essential for both performance and safety while cross-country skiing. Regularly review and fine-tune your settings to accommodate changing conditions and your evolving skiing skills.
FAQs
How do I determine the correct binding placement on my cross-country skis?
To find the ideal binding placement, consider your skiing style and consult your binding manual. Classic and skate skiing may require different positions. Start by marking the ski where your boot toe and heel should align for balance and control.
Can I remount cross-country ski bindings on my own?
It’s best to have a professional technician remount bindings, as it involves drilling new holes, which can weaken skis if done improperly. However, minor adjustments like changing boot sizes can often be done at home with care.
What are the common mistakes to avoid when mounting cross-country ski bindings?
Avoid overtightening screws, incorrect binding placement, using the wrong screws, and neglecting compatibility checks. Always pre-drill holes and consult manufacturer instructions. Seeking professional help is recommended if you’re uncertain.
Can I use the same ski for both classic and skate skiing by adjusting bindings?
While bindings can be adjusted to accommodate both skiing styles on the same ski, it’s not ideal. Different skis are designed for each style, so dedicated skis typically offer better performance.
How often should I check and adjust my cross-country ski bindings?
Regularly inspect bindings for wear and tear and adjust as needed based on your skiing style, experience, and changing conditions. Seasonal adjustments, especially after a change in boot size, are common. Always perform a safety release test to ensure they function correctly.
Wrapping Up
Mounting cross-country ski bindings is not merely a technical task; it’s an art that blends science with a passion for winter sports. As we conclude our journey through this guide, we hope you’ve gained valuable insights into the nuances of this process.
So, before you embark on your next cross-country skiing adventure, take the time to ensure your bindings are mounted accurately.
Whether you’re carving through groomed trails or forging your path through the backcountry, the precision and attention to detail you invest in this task will undoubtedly elevate your skiing experience.
With the right bindings securely fastened to your skis, you’re ready to conquer the winter wonderland with confidence and grace. Thank you for your time.


