Are you missing the satisfying thwack of a well-struck golf ball, confined by current circumstances, or simply seeking to maximize your practice time without leaving home?
A custom-built home golf practice setup can be your ultimate game-changer, allowing you to sharpen your skills regardless of weather or external restrictions.
Embarking on a DIY golf net project isn’t just about saving money; it’s about tailoring a solution that fits your exact specifications, whether you have a compact indoor corner or a sprawling backyard.
This guide will walk you through the essential considerations, diverse material options, robust frame designs, and, critically, the indispensable safety precautions to ensure your home practice facility is both effective and secure.
Key Considerations Before You Swing Into Action
Before you gather your tools and materials, a thoughtful planning phase is crucial. Defining your specific requirements will significantly streamline your design and material choices, preventing costly rework and ensuring your final product meets your expectations.
Planning Your Perfect Practice Space
- Budget Allocation: Is DIY Truly Cost-Effective? The primary motivation for many DIY enthusiasts is often cost savings. However, it’s imperative to conduct thorough research into the market price of commercially available golf nets before you commit to a DIY build.
The last thing you want is for your meticulously crafted net to end up costing more than a professionally manufactured one. Factor in all material costs, tools you might need to purchase, and even your time investment. - Indoor vs. Outdoor Use: Design for Environment. Your intended location for the golf net – indoors or outdoors – will profoundly influence your material selection and overall design.
For outdoor setups, materials must withstand the elements (e.g., UV radiation, moisture). Nylon netting, for instance, can absorb water and lose strength over time if constantly exposed to rain without drying.
Black netting offers superior UV defense for outdoor longevity. Indoor nets, conversely, might prioritize sound dampening and ease of portability. - Space and Size Requirements: Optimizing Your Footprint. Be realistic about the available space. Measure your intended practice area meticulously to ensure your net will fit comfortably and, crucially, allow you to execute a full, uninhibited golf swing.
While specific dimensions vary, a minimum recommendation for effective practice is a net no smaller than 2m x 2m (approximately 6.5ft x 6.5ft). Consider how the net will integrate into your space, ensuring it doesn’t create a cramped or obstructive environment. - Safety Requirements: Understanding Your Ball-Striking. This is arguably the most critical consideration. An honest assessment of your ball-striking consistency is paramount.
Do you occasionally suffer from a “worm burner” (a low, skidding shot) or the dreaded “hosel rocket” (a shank that flies wildly off to the side)? A golf ball ricocheting back at you at high speed is extremely dangerous and something you absolutely want to avoid – speaking from experience, it’s not an encounter you’d wish to repeat. Prioritizing robust safety features from the outset is non-negotiable. - Will You Be Hitting Real Balls? Material Durability. The type of golf ball you intend to hit will directly dictate the durability requirements of your netting material.
If your primary focus is swing mechanics or limited flight practice, safer alternatives like foam balls or “almost golf balls” are excellent choices. These allow for a significantly cheaper and less robust build.
However, if you plan to hit real golf balls, you will need materials specifically designed to withstand high-impact forces to ensure longevity and, more importantly, safety.
Choosing Your Impact Material: What Will Stop the Ball?
Once your foundational requirements are clear, the next step is selecting the material that will absorb and withstand the impact of your shots.
You have options ranging from readily available household items to specialized golf netting.
Household & Hardware Store Options: Budget-Friendly Beginnings
Believe it or not, you might already have suitable materials lying around for your DIY net, especially if you’re planning to use foam balls.
- Painters Drop Sheets: These surprisingly durable sheets have been successfully used with real golf balls.
For added security, especially with real balls, consider doubling up the layers. Be aware that the impact can be quite noisy when hitting real balls into this material. - Thick Blankets / Sheets: While suitable for foam balls, real golf balls will eventually penetrate these materials.
Their strength lies in their versatility: they can serve as a second, soundproofing layer behind a more durable material, particularly useful for indoor setups. They are also excellent for creating side protection, often referred to as a “shank guard,” to contain errant shots. - Heavy-Duty Shade Cloth: If opting for shade cloth, ensure it is of a heavy-duty grade. Lighter grades will not withstand real golf balls.
While effective, this material can be on the pricier side for a DIY solution. Doubling up the material in the primary impact zone is a wise precaution.
Golf-Specific Netting: Optimal Performance for Serious Practice
For those whose budget allows, golf-specific netting offers superior durability and performance.
- Golf Impact Netting (Nylon/Polyester): These nets are engineered to be super strong and durable. A standard 3m x 3m (approximately 10ft x 10ft) golf netting can be found for around $90.
- Nylon Considerations: A key drawback of nylon is its tendency to absorb water, potentially losing strength over time if exposed to prolonged rain without adequate drying. If using outdoors, store the net in dry conditions during extended wet periods to maximize its lifespan.
- Mesh Type: Square mesh is generally preferred over diamond mesh as it is less “stretchy” and tends to hang better.
- Color: For outdoor use, black netting is highly recommended as it provides defense against UV radiation, extending the net’s life compared to untreated white nylon nets.
- Archery Baffle: Designed to stop arrows, this material boasts exceptional strength. A significant benefit of white archery baffles is their potential use as a budget-friendly impact screen for projector-based golf simulations.
However, quality comes at a higher price, with a good 3m x 3m archery screen costing over $200. - Golf Impact Screen: These specialized screens are built to withstand golf ball impacts while simultaneously providing a crisp surface for projector images, making them ideal for indoor golf simulators.
They are highly durable but are significantly more expensive and are designed exclusively for indoor use. If you’re considering a full simulator setup, explore high-quality impact screens for a competitive price.
4. Building Your Frame: Stability for Your Swings
Once you have your chosen netting material, the next step is establishing a robust frame to hang it. This can range from utilizing existing structures to constructing a dedicated frame.
Utilizing Existing Structures: Simple & Efficient
Before embarking on a new build, assess your surroundings for existing structures that could serve as a ready-made frame.
Options include clotheslines, sturdy beams (such as those in a covered BBQ area), or even strong tree branches. This approach can save significant time and money.
DIY Frame Construction Ideas: Tailoring Your Setup
If existing structures aren’t suitable or you prefer a custom build, various DIY frame options are available.
- Simple PVC Pipe Frame: Portable & Economical. PVC pipes and joints offer an excellent, inexpensive, and portable solution. A basic frame can be assembled quickly, often in about 5 minutes, using components like 10 x 1m PVC pipes, 2 elbow joints, and 5 tee joints.
The netting can then be attached with cable ties or, preferably, bungee cords, which allow for easier disassembly.
While gluing joints can add strength, it reduces portability. This design is an ideal “toe in the water” option for beginners. - Metal or Timber Frames: Sturdy & Durable (with a Critical Safety Note). For a more permanent and sturdy setup, metal pipes or timber materials are excellent choices.
They offer superior durability and stability. However, a crucial safety warning applies: if you are using metal or timber, you MUST pad the frame generously. Accidental impact with an unpadded metal frame can be incredibly dangerous, potentially resulting in serious injury.
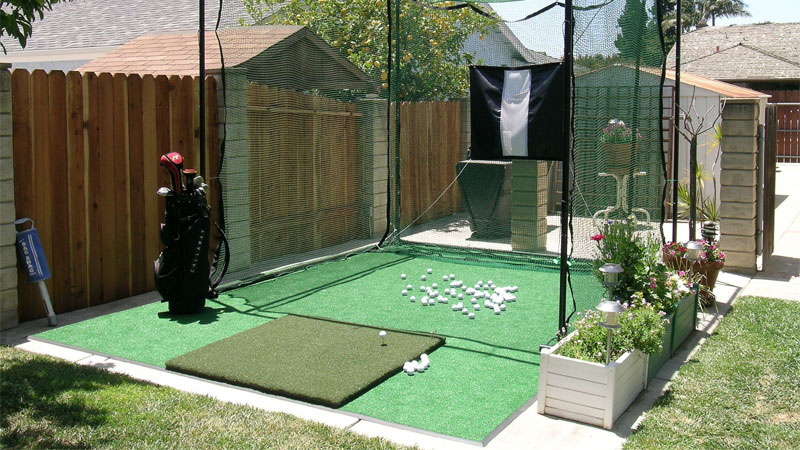
Affordable padding options like pool noodles or foam pipe insulation are readily available and essential for preventing dangerous ricochets. - Full Golf Cage / Enclosure: Comprehensive Protection. To achieve superior structure, stability, and comprehensive protection against various errant shots (e.g., skyed balls, shanks), consider building a full golf cage or enclosure.
This requires additional pipes and specialized joints (3-way and 4-way joints), which are widely available at hardware stores.
While this option entails a slightly higher investment and is less portable, it offers significantly enhanced safety and containment, making it ideal for serious home practice.
Metal or timber can also be used for these robust, permanent setups, especially for outdoor use or indoor simulator enclosures. - Permanent Outdoor Side Posts: Maximum Sturdiness. For the ultimate in outdoor sturdiness, consider staking steel fencing posts directly into the ground.
PVC pipes can then be fitted over these posts, providing a robust and semi-permanent anchoring system for your net. This method offers excellent stability for long-term outdoor installations.
5. Prioritizing Safety: Protect Yourself and Your Surroundings
Regardless of your chosen design or materials, safety must be your paramount concern. Even a single mis-hit shot can have catastrophic consequences.
By integrating specific safety features into your DIY golf net, you can drastically minimize the chances of accidents.
Essential Safety Features for Any DIY Net
- Pad Your Frame: Non-Negotiable Protection. This cannot be stressed enough. If your frame incorporates metal or timber bars (top, side, or bottom), padding these areas is absolutely critical.
Whether it’s a low “worm burner,” a high “skied shot,” or a sideways “hosel rocket,” direct impact with an unpadded frame can cause the ball to ricochet back at dangerous speeds.
Head to your local hardware store (like Bunnings) or discount retailer (like Kmart) and acquire pool noodles or foam pipe insulation. Wrap these materials generously around all exposed frame components.
This simple step will significantly mitigate ricochet hazards and could prevent serious injury. You will undoubtedly thank yourself later for this vital addition. - Side Protection (“Shank Net”): Contain Errant Shots. Unless you’ve built a fully enclosed cage, additional side protection is always a wise investment.
The notorious “shank,” where the ball flies off to the side, can be a major safety concern.
Ready-made shank nets are available, or you can easily use extra netting material to extend protection laterally, ensuring wide coverage for those unpredictable shots. - Top Protection: Guard Against “Skied” Shots. An accidental “skied” shot can send your golf ball soaring straight upwards.
Without adequate top protection, this could result in damage to your ceiling, or worse, send the ball into a neighbor’s yard.
Ensure your net is sufficiently high, or add supplementary netting across the top of your setup to contain these high-flying shots and prevent unintended consequences. - Learn from Commercial Designs: When designing your DIY net, observe how professional golf nets (like Kaizen Golf’s Full Swing Golf Net) incorporate safety features.
Notice elements such as high and inclining roofs, and wide side protection. These commercial designs often provide excellent cues for enhancing the safety and effectiveness of your own DIY construction.
Conclusion: Elevate Your Golf Game at Home
Whether you ultimately choose the convenience of purchasing a high-quality golf net (perhaps even a Kaizen Golf Net!) or embrace the rewarding challenge of building your own, establishing a home golf practice facility is an invaluable asset for any dedicated golfer.
It offers the flexibility to hone your swing mechanics, refine your ball striking, and maintain your passion for the game, all within the comfort and privacy of your own space.
The DIY route, while requiring careful planning and an unwavering commitment to safety, offers unparalleled customization and potential cost savings.
By thoughtfully considering your space, budget, material choices, and frame design, you can create a safe, effective, and truly personal practice haven.