A well-kept infield plays true. Ground balls take predictable hops, runners get solid footing, and players are less likely to slip, stumble, or take a bad bounce to the face. One of the most important jobs behind that kind of surface is nail dragging.
Whether you look after a high school diamond, a youth league complex, or a community park field, learning how to nail drag a baseball field the right way will save you time, protect your infield, and keep the playing surface consistent from the first pitch to the last out.
This guide walks you through everything you need to know, from checking soil moisture and setting nail depth to choosing a dragging pattern and avoiding the mistakes that create lips, low spots, and uneven ground.
What Is a Nail Drag?
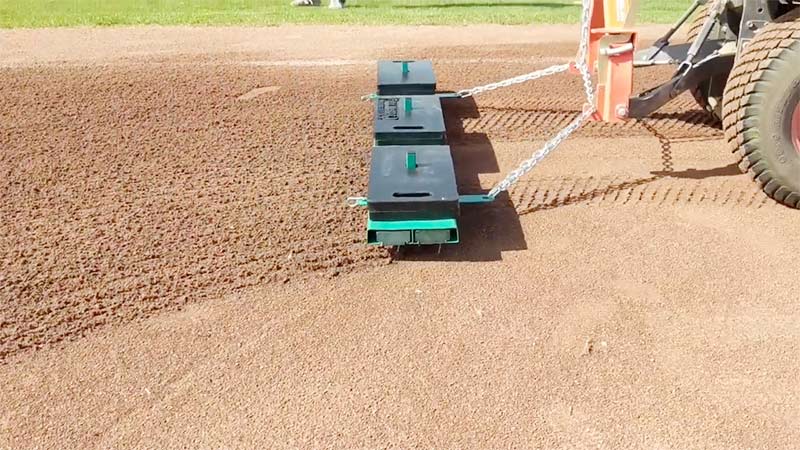
A nail drag is a field grooming tool made of a steel or wooden frame with rows of nails or spikes pointing down toward the ground. It is usually pulled behind a utility vehicle, small tractor, or ATV, though some smaller models can be pulled by hand.
As the drag moves across the infield skin, which is the dirt portion of the field, the nails cut into the top layer of soil and loosen it.
This breaks up the hard crust that forms after play, rain, and foot traffic. The loosened material can then be smoothed with a finishing drag to create an even, cushioned playing surface.
A nail drag is different from a mat drag. A mat drag, often made of steel mesh or a coco fiber mat, smooths and levels the surface. A nail drag loosens it. Most groundskeepers use both, one right after the other.
Why Nail Dragging Matters
Over time, the infield skin becomes compacted. Cleats, rakes, rain, and the weight of equipment press the soil down until it turns hard and slick. A compacted infield causes several problems:
- Ground balls skip faster and take unpredictable bounces.
- Players lose traction when running, fielding, and sliding.
- Water sits on the surface instead of soaking in, which leads to puddles and rainouts.
- Cleat holes and footprints harden in place and create rough patches.
Nail dragging loosens the top layer so the surface can absorb water, accept conditioner, and give players firm but forgiving footing. It also mixes in infield conditioner, such as calcined clay, so it stays evenly spread instead of collecting in certain spots.
Tools and Equipment You Need
Before you start, gather the following:
- A nail drag in good condition, with straight nails of even length
- A tow vehicle, or a hand-pulled drag for small fields
- A finishing drag, such as a steel mat or coco mat
- A leaf rake and a landscape rake for edges and tight areas
- A hand tamp and packing clay for repairing holes at the plate and mound
- Base plugs to cover the base anchors
- A hose or irrigation system for watering after grooming
Check the Soil Moisture First
Moisture is the biggest factor in how well a nail drag works. Aim to drag when the infield is slightly damp, not soaking wet and not bone dry.
A simple test is to grab a handful of infield soil and squeeze it. If it holds together loosely and crumbles when you poke it, the moisture is about right. If it sticks to your hand or forms a muddy ball, it is too wet. If it falls apart into dust, it is too dry.
Dragging a wet infield tears up the surface, leaves ruts, and forms clumps that dry into hard clods. Dragging a dry infield kicks up dust and loosens material that blows away rather than settles.
If the field is too dry, give it a light watering and let the surface absorb it before you begin. If it is too wet, wait. A little patience here saves hours of repair work later.
Prepare the Field Before Dragging
A few minutes of prep work makes the drag far more effective:
- Remove the bases and insert base plugs so the anchors do not fill with dirt or catch the drag.
- Repair the pitcher’s mound, batter’s boxes, and catcher’s box with packing clay and tamp them firm. These clay areas should be maintained by hand and kept out of the drag path.
- Hand rake around home plate, the bases, and along the grass edges, pulling material away from the turf and back onto the skin.
- Walk the infield and pick up rocks, sticks, trash, or lost equipment.
How to Nail Drag a Baseball Field Step by Step
Step 1: Set the Nail Depth
Most nail drags work best when the nails cut about a quarter inch to a half inch into the surface. For routine grooming, stay on the shallow side.
Going too deep loosens too much material and leaves a soft, unstable surface that players sink into and that is hard to firm back up. Some drags let you adjust depth with added weight or a hitch setting, so check your equipment and test it on a small area first.
Step 2: Start Away From the Grass
Never start right at the edge of the turf. Begin a few feet in from the grass lines so the nails do not catch the turf or push soil into it. The areas closest to the grass will be finished by hand later.
Step 3: Drive Slowly and Steadily
Keep your speed low, around 3 to 5 miles per hour. Driving too fast makes the drag bounce, which leaves a wavy surface and throws material toward the edges. A slow, steady pace lets the nails cut evenly and keeps the soil in place. Avoid sudden stops and sharp turns, since both gouge the surface.
Step 4: Choose a Dragging Pattern
The pattern you use affects where material ends up. Common options include:
- Circular or spiral pattern: Begin near the outer edge of the skin and work inward in wide loops toward the mound area. This tends to pull material toward the center rather than pushing it into the grass.
- Back-and-forth pattern: Drive parallel passes that follow the arc of the infield from the first base side to the third base side, shifting over slightly with each pass.
- Figure-eight or S pattern: Make wide, overlapping loops across the infield to mix the surface evenly.
The most important rule is to change your pattern from one session to the next. Using the same pattern every day moves material in the same direction, which creates high spots, low spots, and buildup along the edges.
Step 5: Stay Off the Grass Edges
Keep the drag at least a foot or two away from the grass edges for the whole job. When the drag runs into the turf, it deposits soil in the grass.
Over time, that soil builds into a raised ridge called a lip, which causes bad hops and holds water. Make your turns on the dirt, not the grass, and keep them wide.
Step 6: Exit the Infield in a Different Spot Each Time
When you finish, some loose material will collect in front of the drag. If you always leave the infield at the same point, that material piles up in one area. Exit at a different spot each time, lift the drag if your setup allows it, and rake out any leftover pile by hand.
Step 7: Finish With a Mat Drag
After nail dragging, switch to your finishing drag and go over the infield again. Use a pattern that is slightly different from the one you used with the nail drag. The mat smooths the loosened soil and fills small low spots.
Afterward, hand rake the edges, the areas around the bases, and any spots the drag could not reach, always pulling material away from the grass.
Step 8: Water the Infield
A light, even watering settles the loosened soil, cuts down on dust, and gives the surface a firm but cushioned feel. Water in several light passes instead of one heavy soaking to avoid puddles and runoff. Then replace the bases and line the field as needed.
Common Nail Drag Mistakes to Avoid
Even experienced crews slip into habits that slowly damage an infield. Watch out for these:
- Dragging when the field is too wet or too dry
- Driving too fast or making sharp turns
- Using the same pattern every time
- Running the drag into the grass edges
- Leaving the infield at the same exit point
- Setting the nails too deep for routine grooming
- Dragging over the mound or batter’s boxes, which should be maintained by hand
- Skipping the finishing drag and leaving a rough surface
Setting a Nail Drag Schedule
How often you nail drag depends on how much the field is used and on the weather. Fields that host games and practices nearly every day may need a nail drag before each use, while lightly used fields might only need it a few times a week. Between innings or during short breaks, a mat drag is usually enough.
Nail dragging too often can loosen the surface more than needed, so pay attention to how the infield responds. If it feels soft and players are sinking in, cut back. If it is hard and slick, nail drag more often, or set the nails slightly deeper for an occasional deeper session.
Caring for Your Nail Drag
Inspect the drag before each use. Replace bent, broken, or missing nails, and make sure all nails are close to the same length so the drag cuts evenly. Clean off caked soil after every use and store the drag off the ground in a dry place to prevent rust.
Check the hitch, chains, and welds regularly as well. A drag in good shape gives you consistent results and will last for many seasons.
Final Thoughts
Learning how to nail drag a baseball field is one of the most useful skills a groundskeeper, coach, or volunteer can have.
The process is simple, but the details make the difference: check moisture before you start, keep the nails shallow, drive slowly, change your pattern, and stay away from the grass.
Always finish with a mat drag and a light watering. Follow these steps consistently and your infield will stay level, safe, and ready for play all season long.