In baseball, a jammed thumb is a common injury that can cause discomfort and hinder performance on the field.
Properly taping a jammed thumb is crucial for providing support, stability, and pain relief, allowing players to continue playing confidently.
By immobilizing the injured thumb and providing compression, taping can help reduce swelling and promote healing.
Additionally, taping can prevent further injury and enable athletes to maintain grip strength and dexterity while handling a bat or ball.
Understanding the correct taping technique is essential for baseball athletes, coaches, and trainers to manage thumb injuries effectively and ensure players can perform at their best despite minor setbacks.
In this guide, we’ll explore step-by-step instructions on how to tape a jammed thumb for baseball, helping players stay in the game and minimize discomfort.
What is Jammed Thumb Baseball
In baseball, a jammed thumb is an injury sustained when the thumb is forcefully bent backward, hyperextended, or compressed against another object, such as a ball, bat, or fielding glove.
This can damage the ligaments, tendons, or joints of the thumb, causing pain, swelling, and limited mobility.
Jammed thumbs are familiar among baseball players, particularly those involved in catching, fielding, or batting.
The injury can occur during various scenarios, such as catching a ball awkwardly, being hit by a pitch, or sliding into a base with the thumb outstretched.
Jammed thumbs can impact a player’s ability to grip a bat, catch, or throw a ball effectively and may require proper treatment and taping to aid in recovery and prevent further injury.
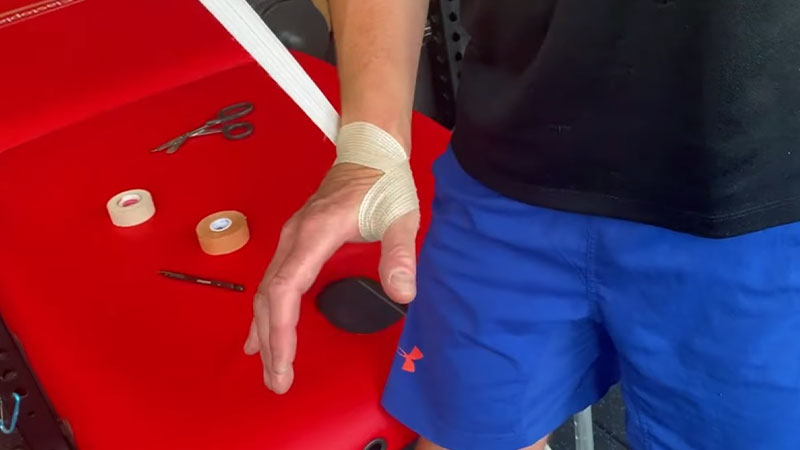
How to Tape a Thumb for Baseball: Things Needed
To tape a thumb for baseball, you’ll need the following items:
- Athletic tape: Choose a high-quality, adhesive athletic tape that provides sufficient support and stays in place during play.
- Scissors: Use scissors to cut the tape to the desired length and shape for taping the thumb effectively.
- Pre-wrap or foam underwrap (optional): Applying pre-wrap or foam underwrap before taping can help protect the skin and prevent irritation or discomfort from the adhesive tape.
- Ice pack (optional): If the thumb is swollen or inflamed due to injury, applying an ice pack before taping can help reduce swelling and numb pain.
- Hand sanitizer or rubbing alcohol: Clean the thumb and surrounding area thoroughly before applying tape to ensure proper adhesion and hygiene.
- Towel or cloth: Use a towel or cloth to dry the thumb and remove any excess moisture before taping.
- Someone to assist (optional): While taping the thumb independently, having someone help you can make the process easier and ensure the tape is applied correctly and securely.
By gathering these items, you’ll be well-prepared to effectively tape your thumb for baseball and provide support and stability during play.
How To Tape A Jammed Thumb For Baseball: Step-by-step Process
Taping a jammed thumb for baseball requires careful attention to detail and proper technique to provide support and stability while allowing for continued mobility.
Here’s a step-by-step process to effectively tape a jammed thumb:
Prepare the Thumb and Materials
Begin by cleaning the thumb and surrounding area with hand sanitizer or rubbing alcohol to remove any dirt, oils, or sweat that could affect tape adhesion.
Cut a strip of athletic tape to the desired length, typically around 12-18 inches, depending on the thumb’s size and the injury’s extent.
Apply pre-wrap or foam underwrap to protect the skin and provide additional cushioning before taping.
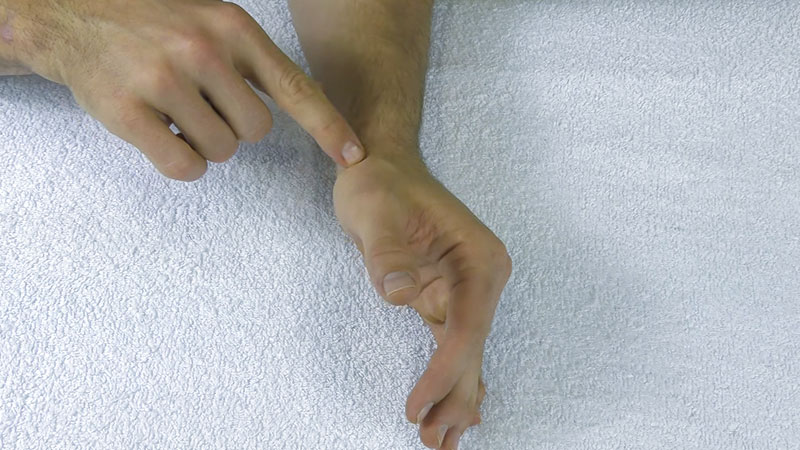
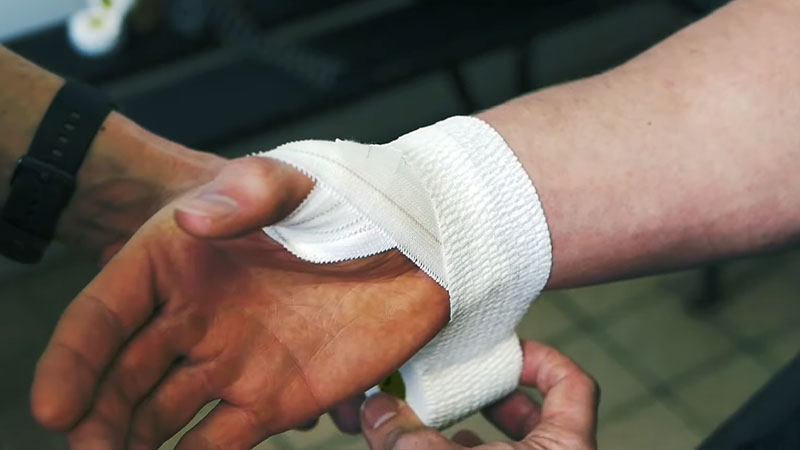
Create an Anchor Point
Start by anchoring the tape at the base of the thumb, near the wrist. Leave a small tape tail to hold onto for a more straightforward application.
Wrap the tape once around the base of the thumb, ensuring it lies flat against the skin without wrinkles or folds.
Stabilize the Thumb Joint
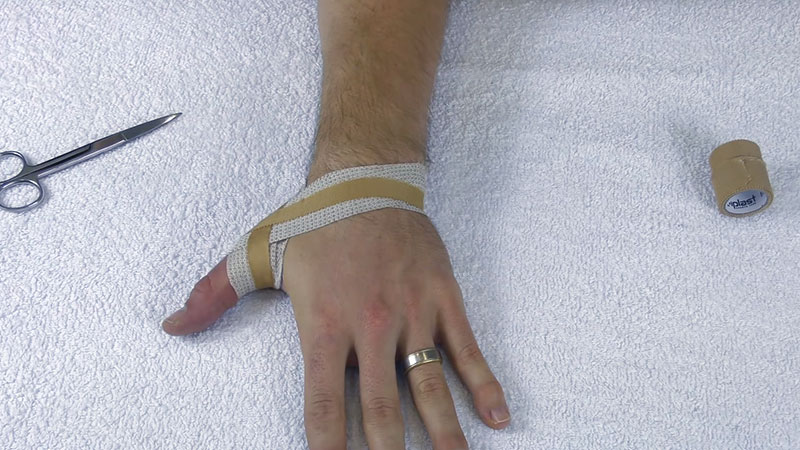
Begin wrapping the tape diagonally across the back of the thumb joint (the metacarpophalangeal joint) towards the tip of the thumb.
Continue wrapping the tape around the thumb, overlapping each layer by about half the width of the tape. This provides stability to the joint while allowing for some flexibility and movement.
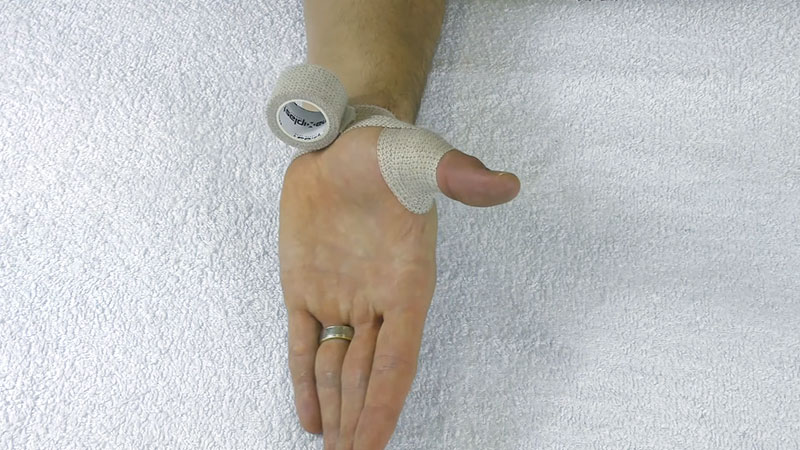
Support the Thumb Pad
After wrapping the joint, guide the tape diagonally across the thumb pad, covering the area where the thumb contacts the ball or bat during play.
Ensure the tape is snug but not too tight, allowing for comfortable movement and flexibility while supporting the injured thumb.
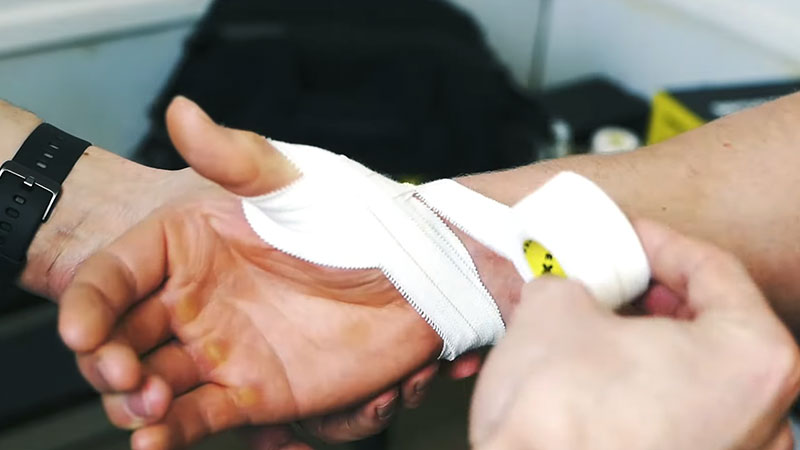
Secure the Tape
Once you’ve covered the thumb pad, wrap the tape around the base of the thumb once more to secure the end. Press firmly on the tape to ensure it adheres properly to the skin and stays in place during activity.
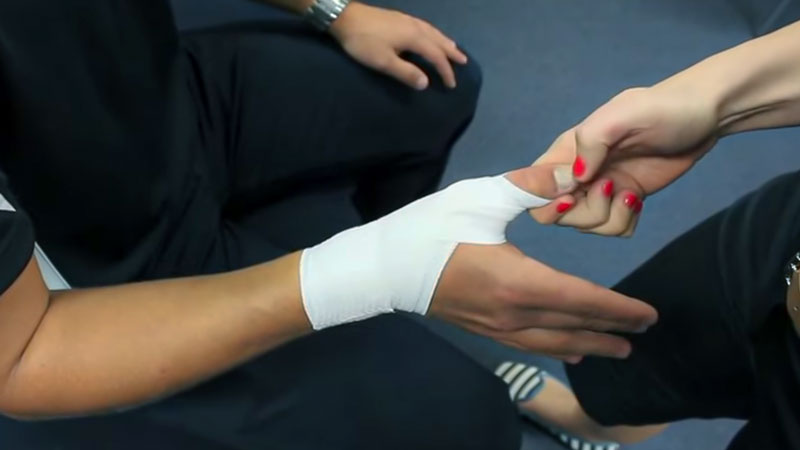
Test for Comfort and Mobility
After taping, gently move the thumb to ensure it can bend and flex comfortably without restriction. If the tape feels too tight or uncomfortable, carefully remove it and reapply it with less tension.
Finally, test your grip on a bat or ball to ensure the taped thumb provides adequate support without impeding your ability to play effectively.
By following these steps, you can effectively tape a jammed thumb for baseball, providing support and stability while allowing for continued participation in the game.
Remember to monitor the thumb for discomfort or irritation during play and adjust the tape for optimal comfort and performance.
How to Wrap a Jammed Thumb
Learning how to wrap a jammed thumb is easy. Wrapping a jammed thumb is a simple yet effective way to provide support and stability while allowing for mobility during activities like baseball. Here’s a brief guide in three to four steps:
Prepare the Thumb
Start by cleaning the thumb and surrounding area with soap and water to remove dirt or oils.
Dry the thumb thoroughly with a towel to ensure the tape adheres properly. Apply a pre-wrap or foam underwrap to protect the skin and provide additional comfort.
Anchor the Tape
Begin by wrapping a strip of athletic tape around the base of the thumb, just above the joint closest to the palm.
Ensure the tape is snug but not too tight to avoid cutting off circulation. This anchor helps secure the tape and provides a foundation for further wrapping.
Stabilize the Joint
With the thumb slightly bent, wrap the tape diagonally across the back of the thumb, covering the injured joint.
Continue wrapping the tape around the thumb, overlapping each layer slightly to provide stability and support to the joint. Extend the tape beyond the joint to ensure complete coverage and support.
Secure the End
Once you’ve wrapped the thumb sufficiently, cut the tape with scissors and secure the end by pressing it firmly against the tape on the thumb. Smooth any wrinkles or folds in the tape to ensure a secure and comfortable fit.
By following these steps, you can effectively wrap a jammed thumb, providing support and stability while allowing for mobility during activities like baseball.
Remember to monitor the thumb for any discomfort or changes in sensation and adjust the wrapping if necessary.
How to Tape a Catcher’s Thumb
Taping a catcher’s thumb is crucial for providing support and stability, especially during the rigors of catching in baseball or softball. Here’s a brief guide on how to tape a catcher’s thumb effectively:
Preparation and Cleaning
Before applying tape, ensure the thumb and surrounding area are clean and dry. Use hand sanitizer or rubbing alcohol to clean the skin thoroughly, removing dirt, oils, or sweat.
This helps promote proper adhesion of the tape and reduces the risk of skin irritation.
Apply Anchor Tape
Start by anchoring the tape at the base of the thumb, just above the joint closest to the palm.
Wrap a strip of athletic tape snugly around the base of the thumb, ensuring it provides support without cutting off circulation. This anchor tape will be the foundation for the rest of the taping process.
Stabilize and Protect
With the anchor tape in place, wrap additional strips diagonally across the back of the thumb, covering the injured joint or area.
Continue wrapping the tape around the thumb, overlapping each layer slightly to provide stability and support. Pay attention to the areas most susceptible to injury, such as the ligaments and tendons around the thumb joint.
Secure and Test
Once you’ve wrapped the thumb sufficiently, cut the tape with scissors and secure the end by pressing it firmly against the tape on the thumb. After taping, gently move the thumb to ensure a comfortable range of motion.
The tape should provide support while allowing flexibility and movement necessary for catching and gripping the ball effectively.
Following these steps, you can effectively tape a catcher’s thumb to provide support and stability during play, reducing the risk of injury and promoting confident performance behind the plate.
How to Tape a Sprained Thumb
Taping a sprained thumb is a simple yet effective way to provide support, stability, and pain relief while promoting healing. Here’s a brief guide on how to tape a sprained thumb:
Prepare the Thumb
Start by cleaning the thumb and surrounding area with soap and water to remove dirt or oils. Pat the area dry with a towel to ensure good adhesion of the tape.
Apply Anchor Strip
Begin by tearing off a strip of athletic tape approximately 12 inches long. Place one end of the tape on the inside of the wrist, just below the base of the thumb.
Wrap the tape around the back of the hand and bring it up between the thumb and index finger. Ensure the tape is snug but not too tight.
Create Support Strips
Tear off two shorter strips of athletic tape, each about 6 inches long. Starting at the base of the thumb, wrap one strip diagonally across the back of the thumb, overlapping slightly with each pass.
Repeat this process with the second strip, wrapping it diagonally in the opposite direction. This crisscross pattern helps stabilize the thumb joint.
Secure the Tape
Once the thumb is adequately taped, tear off another strip of athletic tape to serve as a securing strip. Place this strip horizontally across the back of the hand, covering the ends of the diagonal support strips. Press down firmly to ensure the tape adheres well.
Test Range of Motion
After taping, gently move the thumb to ensure a comfortable range of motion. The tape should provide support while still allowing for some flexibility.
Monitor Comfort
Throughout the day, pay attention to any discomfort or changes in sensation. If the tape feels too tight or causes discomfort, remove it immediately and seek medical attention if necessary.
By following these steps, you can effectively tape a sprained thumb, providing the support needed for healing and preventing further injury.
FAQs
Can I tape a jammed thumb for baseball on my own?
Yes, taping a jammed thumb for baseball can typically be done independently. However, having someone assist you can make the process easier and ensure the tape is applied correctly and securely.
How tight should I wrap the tape around my jammed thumb?
Wrap the tape snugly enough to provide support and stability without cutting off circulation or causing discomfort. It should feel secure but not overly tight, allowing for comfortable movement and flexibility during play.
How long should I keep the tape on my jammed thumb?
You can keep the tape on your jammed thumb for as long as needed, depending on the injury’s severity and comfort level. Replace the tape if it becomes loose, damaged, or uncomfortable, and remove it once the thumb has fully healed.
Will taping my jammed thumb affect my ability to grip the bat or ball?
Properly taping a jammed thumb should provide support while allowing for adequate grip strength and agility.
Experiment with different taping techniques to find the right balance of support and mobility for your playing style.
Can I still play baseball with a taped, jammed thumb?
Yes, taping a jammed thumb can help reduce pain and support you in playing baseball while the thumb heals.
However, listen to your body and avoid activities that exacerbate discomfort or compromise your ability to play effectively.
Wrapping Up
Knowing how to tape a jammed thumb for baseball properly is essential for players to manage injuries effectively and continue playing confidently.
By following the step-by-step process and understanding proper taping techniques, athletes can support and stabilize the injured thumb while maintaining grip strength and flexibility.
It’s crucial to monitor the thumb for any signs of discomfort or irritation during play and adjust the tape for optimal comfort and performance.
With proper taping, baseball players can minimize the impact of thumb injuries and stay in the game.


