There is a specific, sinking feeling that every golfer knows: that unmistakable “crack” or hollow vibration felt through the grip when a clubhead fails.
You are at the range, mid-session, and suddenly, your high-performance driver—the most expensive piece of equipment in your bag—is in two pieces.
For many, the first instinct is to head to the nearest pro shop or, worse, browse for a costly replacement. However, for the DIY-minded golfer, a broken hosel connection does not have to mean the end of the club’s life.
This comprehensive guide will walk you through the professional-grade process of re-attaching a driver head.
By leveraging precision techniques such as step-drilling and strategic epoxy application, you can restore your club to range-ready condition without the premium price tag of professional repair services.
Understanding the Anatomy of the Failure
Before picking up a tool, it is crucial to diagnose the break. Most driver failures occur at the hosel, the socket where the shaft meets the clubhead. When a shaft snaps or the factory adhesive fails, you are often left with a “plug” of graphite or carbon fiber remaining inside the hosel.
The goal of this repair is threefold:
- Extraction: Completely clearing the old debris from the hosel.
- Preparation: Ensuring the shaft and clubhead surfaces are primed for a new bond.
- Structural Bonding: Utilizing high-strength adhesives to create a connection capable of withstanding 100+ mph swing speeds.
The Professional DIY Toolkit
To achieve a Fortune 500-level standard of repair, you must move beyond basic household tools. The following list represents the essential equipment used in this process:
- Heat Source: A heat gun is often preferred over a torch to provide a more controlled, even distribution of heat, reducing the risk of scorching the club’s finish.
- Variable Speed Drill: Necessary for the extraction of old material.
- Step-Drill Bits: A variety of sizes, starting from very small to those matching the internal diameter of the hosel.
- Safety Gear: High-quality eye protection is non-negotiable, as drilling into graphite creates fine, sharp debris.
- Adhesives: While golf-specific epoxies are available, high-strength industrial options like JB Weld are frequently used for their durability and gap-filling properties.
- Cleaning Tools: Wire brushes or specialized hosel cleaners for final surface preparation.
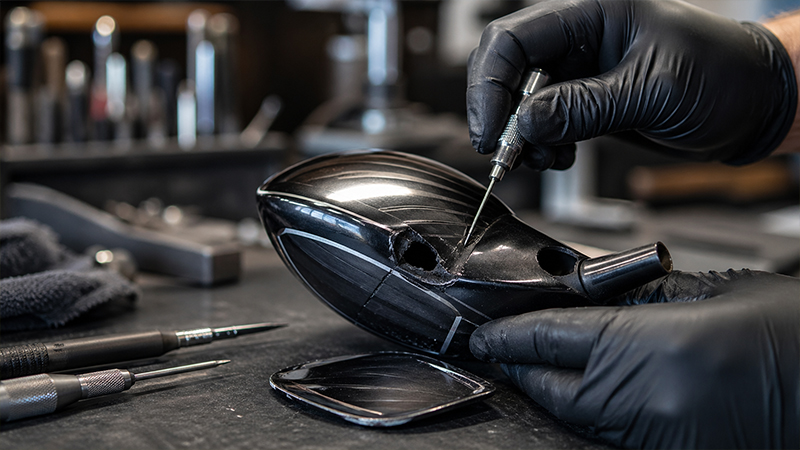
Step 1: Thermal Extraction and Hosel Preparation
The most difficult part of the repair is removing the remnants of the old shaft. Because these are typically bonded with industrial epoxy, mechanical force alone is insufficient.
The Role of Heat
Apply heat directly to the hosel area using your heat gun. In most cases, it takes approximately five minutes of consistent heating before the hosel becomes hot to the touch. This heat softens the existing epoxy, allowing the drill bits to “bite” into the material more effectively.
The “Step-Drilling” Technique
Rather than attempting to remove the entire plug at once, professionals utilize step-drilling.
- Start Small: Use a small drill bit to create a pilot hole down the center of the old graphite plug.
- Increase Size: Gradually move to larger bits. The goal is to get the drill to “grip” the carbon or graphite, often pulling out large chunks of debris at once.
- Stay Parallel: It is vital to keep the drill bit perfectly parallel to the hosel walls. If the drill tilts, you risk Boring into the metal of the clubhead, which can permanently ruin the loft and lie of the driver.
The “Top Plug” Warning
Inside many modern drivers, there is a small plug at the very bottom of the hosel. Do not go too deep or drill too aggressively at the base. If you push this plug down into the hollow chamber of the driver head, it will create an internal rattle that is extremely difficult to fix without professional intervention.
Step 2: Preparing the Shaft and Ferrule
Once the hosel is clear, your attention must turn to the shaft. If the shaft snapped at the hosel, you may need to “trim” the tip to create a clean, structural surface for re-attachment.
Managing the Ferrule
The ferrule is the plastic piece that covers the junction of the shaft and head.
- Repositioning: You can often use a heat gun or even hot water to soften the ferrule and slide it further up the shaft to make room for the repair.
- Risk of Overheating: Be cautious; ferrules are made of plastic and can easily melt or deform if exposed to too much direct heat. If the ferrule is damaged, it is an inexpensive part that can be replaced.
Addressing Internal Debris
Before bonding, shake the clubhead. If you hear a rattle, there is debris inside the head. While some debris can be removed through the hosel hole, some may remain trapped.
A common professional “hack” is to strategically use the new epoxy to “trap” this debris at the bottom of the hosel during the bonding phase, effectively silencing the rattle.
Step 3: The Critical Bond
The integrity of your repair depends entirely on the epoxy phase. This is not the time to be conservative with materials.
Coating and Seating
- Internal Coating: Fill the hosel with a generous amount of epoxy, ensuring it reaches the very bottom.
- Shaft Coating: Apply a layer of epoxy to the tip of the shaft, rolling it to ensure 360-degree coverage.
- Assembly: Insert the shaft into the hosel. A “dual-coating” method—putting glue on both the head and the shaft—ensures there are no air pockets that could lead to bond failure.
- The Hosel Cap: If your club uses a hosel cap or a ferrule that seems slightly loose, apply a small amount of adhesive to the transition area to ensure a seamless, professional-looking fit.
The Curing Process
Patience is the hallmark of quality craftsmanship. Even “quick-set” epoxies require time to reach their maximum shear strength. You should let the club dry overnight in a stable, room-temperature environment before attempting any practice swings.
Post-Repair Inspection and Testing
Before taking your “new” driver to the tee box, conduct a final inspection. Check that the head is seated fully and that the alignment (the orientation of the grip and markings) is correct.
Once the epoxy has fully cured, take the club to the range for a stress test. Start with 50% swings to ensure the bond is holding, gradually moving to full-speed impacts. A successful repair should feel indistinguishable from the original factory bond.
Enhanced FAQ: Expert Insights for the DIY Golfer
Q: Can I use standard hardware store epoxy for this repair?
While golf-specific epoxies are designed to handle the specific vibrations of a golf swing, high-strength industrial epoxies like JB Weld have been proven effective for DIY repairs when applied correctly.
Q: What if I push the internal plug into the head?
If the plug falls in and causes a rattle, you can attempt to “catch” it with a small amount of “rattle-stop” (a sticky substance) or use the epoxy-trapping method mentioned in Section IV.
Q: Will trimming the shaft affect my club’s performance?
Trimming a small amount off the tip (usually less than an inch) will make the shaft feel slightly “stiffer” and will marginally decrease the total length of the club. For many amateur golfers, this change is negligible or even beneficial for control.


