In the modern era of golf, data is the ultimate equalizer. Whether you are a weekend warrior or a scratch player, the ability to track every shot, understand your true club distances, and receive AI-driven caddie advice is no longer a luxury—it is a competitive necessity.
Arccos Golf has established itself as the gold standard in this space, but for many players, the journey to lower scores begins with a simple, tactile question: How do I properly install these sensors, and more importantly, will they stay put during a high-intensity round?
We have analyzed the most common friction points for users transitioning to a data-driven game. This comprehensive guide serves as your definitive resource for the seamless installation and long-term security of your Arccos Smart Sensors.
Foundation: Why Proper Installation is Your First Step Toward a Lower Handicap
Before we dive into the “how-to,” we must understand the “why.” Arccos Smart Sensors are not merely plastic caps; they are sophisticated pieces of hardware designed to communicate with the Arccos Caddie app via ultra-high frequency.
If a sensor is loosely installed, it can lead to missed shots, inaccurate data, or the eventual loss of the device.
The Search Intent Behind the Guide
Golfers looking for this information are typically in the “Onboarding” stage of the user journey. They have invested and now face the technical hurdle of setup.
Unboxing and Preparation: Setting the Stage for Success
The installation process begins the moment you open the box. To ensure a professional-grade setup, follow these preparatory steps:
- Inventory Check: Ensure you have 13 green sensors (for your woods, hybrids, irons, and wedges) and one specialized black sensor (reserved specifically for your putter).
- Sensor Activation: Each sensor comes with a protective sticker designed to preserve battery life during shipping. You must remove these stickers from every sensor before beginning the physical installation.
- Grip Inspection: Check the butt end of your golf grips. Every standard grip features a small hole designed for air escape during regripping; this is the anchor point for your Arccos sensors.
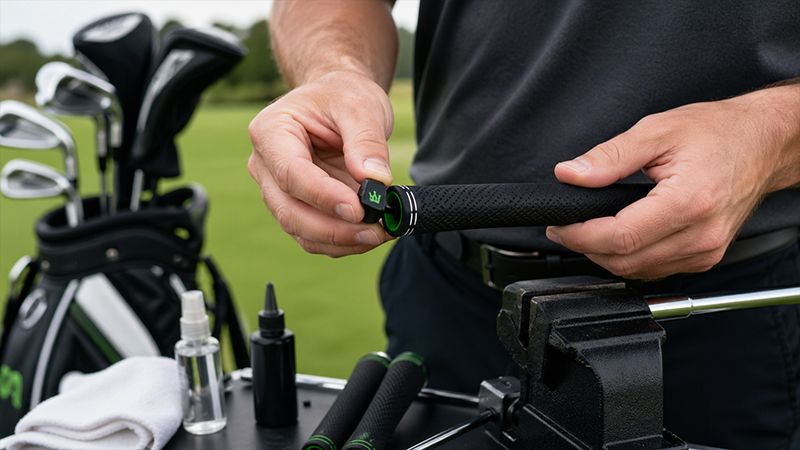
The “Righty-Tighty” Method: Installing Standard Club Sensors
For the vast majority of your bag, the installation is remarkably straightforward. However, the nuance lies in the tension and the “flush” finish.
Step-by-Step Execution
- Alignment: Position the screw at the bottom of the green sensor directly over the hole in the grip’s butt end.
- Initial Contact: Give the sensor a firm, gentle push to engage the threads into the rubber or cord material of the grip.
- The Twist: Using a “righty-tighty” (clockwise) motion, screw the sensor into the club.
- The Flush Finish: Continue twisting until the sensor is seated flush against the grip. It should feel secure and integrated, not like an afterthought.
Expert Tip: While you want the sensor to be tight to avoid loss, do not overtighten to the point where you risk stripping the rubber of the grip or damaging the sensor’s housing.
The Putter Pivot: Managing Standard and SuperStroke Grips
The putter is the most critical club in your bag for data tracking, as it defines your “Strokes Gained: Putting” metrics. Because putter grips vary wildly in shape and size, Arccos provides specific hardware for this task.
The Standard Putter Grip
If you use a traditional putter grip, simply use the black sensor. The installation follows the same “righty-tighty” protocol as your other clubs.
The SuperStroke Challenge
Many premium golfers utilize SuperStroke grips, which often feature a CounterCore weight system. A standard screw-in sensor will not work here.
- The Solution: You must use the Arccos SuperStroke Putter Grip Accessory kit.
- The Kit: This specialized accessory includes a unique housing and a tightening tool specifically engineered for both counter-core and non-counter-core SuperStroke models.
- The Result: A professional-grade fit that ensures your putter data is captured with 100% accuracy without compromising the feel of your grip.
Digital Synergy: Pairing Your Sensors with the Arccos Caddie App
Once the hardware is physically secured, you must “introduce” your clubs to the Arccos Caddie app. This is where the magic of AI-driven golf begins.
The Pairing Protocol
- App Activation: Open the Arccos Caddie app on your smartphone and navigate to the “Clubs” or “Sensors” section.
- QR Integration: The app will prompt you to pair each sensor. Most modern Arccos versions utilize a QR code system for rapid identification.
- The “Bag Buffer” Strategy: This is a crucial step to avoid the common “cross-pairing” error. Keep all your clubs inside your golf bag during the pairing process, pulling out only the specific club you are currently syncing. This prevents the app from accidentally picking up signals from neighboring sensors.
Durability and Security: Addressing the “Will They Fall Out?” Concern
One of the most frequent questions from skeptical golfers is: “If I’m throwing my clubs into the bag or playing in rough conditions, won’t these sensors just fly off?”
The short answer: No.
Real-World Stress Testing
Evidence from long-term users and technical reviews confirms that Arccos sensors are incredibly resilient. Even if you are someone who “throws” their clubs into the bottom of the bag, causing them to bang against one another, the sensors remain securely fastened.
Furthermore, the sensors are built to withstand significant wear and tear. Even after months of being dragged in and out of a bag, the internal electronics continue to function at peak performance.
The “righty-tighty” screw mechanism creates enough friction within the grip to ensure that the sensor stays put until you intentionally decide to unscrew it.
Advanced Maintenance: Keeping Your Tech in Peak Condition
- The “Check-Up”: Every few rounds, give your sensors a quick “quarter-turn” check to ensure they haven’t vibrated loose. While they are secure, the varying expansion and contraction of rubber grips in heat can occasionally necessitate a minor adjustment.
- Grip Changes: When it’s time to regrip your clubs, simply unscrew the sensors (lefty-loosey) and set them aside. Once your new grips are installed and dry, repeat the installation process.
- Cleaning: Use a damp cloth to wipe the top of the sensors. Dirt or grass buildup on the sensor face can occasionally interfere with the light-sensing technology used to detect shots.
Enhanced FAQ: Expert Answers to Your Deepest Questions
Q: Can I use Arccos sensors on non-standard grips like oversized or cord grips?
A: Yes. As long as there is a hole at the butt end of the grip, the sensor will screw in. For extremely hard cord grips, you may need to apply a bit more downward pressure during the initial “push” to get the threads started.
Q: What happens if I lose a sensor?
A: Because they are screwed in so securely, loss is rare. However, if a sensor is misplaced, the Arccos Caddie app allows you to unpair the old sensor and pair a replacement in seconds.
Q: Do the sensors affect the swing weight of my clubs?
A: Arccos sensors are designed to be ultra-lightweight. Most golfers find that the impact on swing weight is negligible and does not affect their feel or performance.
Q: Is the SuperStroke accessory difficult to install?
A: Not at all. The kit comes with a specific tightening tool that makes the process as simple as the standard screw-in method, albeit with a different housing.
Conclusion
Installing your Arccos Smart Sensors is more than just a hardware setup; it is the foundational step in a journey toward better golf.
By following the “righty-tighty” method, ensuring a flush fit, and utilizing the correct accessories for your putter, you create a seamless bridge between your physical swing and digital insights.
The security of these sensors has been proven through rigorous use—they are built to stay in your clubs, regardless of how aggressively you handle your bag.
With your sensors properly installed and paired, you are now ready to step onto the first tee with the confidence that every drive, approach, and putt is being tracked by the world’s most advanced golf AI.


