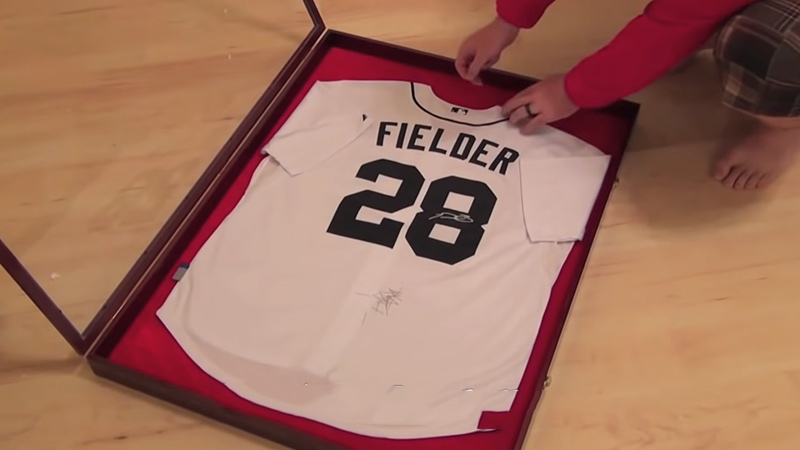
Owning an autographed sports jersey is more than just having a piece of memorabilia; it is holding a tangible slice of history, a defining moment of athletic brilliance, and often a significant financial and emotional investment.
Whether it is a game-worn treasure from a legendary championship run or a prized possession signed by your all-time favorite athlete, displaying it properly transforms a simple piece of fabric into a stunning centerpiece for your home, office, or man cave.
However, improper framing can permanently damage your investment. Direct sunlight can cause Sharpie signatures to fade into ghostly blurs, cheap cardboard can discolor and ruin delicate fabrics through acid degradation, and careless pinning can leave irreversible holes.
Why Professional Framing Matters for Autographed Memorabilia
Before diving into the tools and techniques, it is essential to understand the forces working against your memorabilia.
Sports jerseys are dynamic, organic textiles, while signatures—usually executed in permanent marker, paint pen, or ink—are vulnerable to environmental decay.
- Ultraviolet (UV) Radiation: Light is the ultimate enemy of collectibles. Unfiltered sunlight or harsh indoor fluorescent lighting breaks down ink pigments, causing signatures to fade completely within a few years.
- Acidic Degradation: Standard framing materials like regular cardboard, cheap matting, and packaging tape contain high levels of acid. Over time, this acid migrates into the fabric, causing yellowing, fabric rotting, and discoloration.
- Moisture and Dust: High humidity invites mold, mildew, and musty odors, while airborne dust settles permanently into the fibers of the jersey if the frame is not tightly sealed.
By utilizing museum-grade conservation framing principles, you neutralize these threats entirely.
Step 1: Gathering Your Professional Toolkit
Achieving a clean, professional finish requires the right equipment. Attempting to shortcut this process with household tape or standard picture frames will compromise the presentation and safety of your item.
Essential Supplies Checklist
- Deep Shadow Box Frame: Look for a frame with an interior depth between 1.5 and 3 inches. Jerseys are bulky, especially around the collar and seams, and a shallow frame will press the fabric flat against the glass, trapping moisture and distorting the visual depth.
- UV-Protective Acrylic or Glass: Never use standard window glass. Select conservation-grade acrylic or glass rated to block at least 99% of harmful UV rays. Acrylic is also lighter and shatter-resistant, making it safer for hanging large shadow boxes.
- Acid-Free Backing Materials: Secure heavy-duty, acid-free foam core boards or conservation mat boards to serve as the foundation of your display.
- Securing Tools: Stainless steel straight pins (which resist rust), clear fishing line, or fine archival thread.
- Pressing Tools: A garment steamer or an iron with a reliable low-heat setting, plus a clean cotton pressing cloth.
- Enhancement Elements (Optional): Printed photographs of the athlete, corresponding trading cards, game tickets, or a custom-engraved brass nameplate.
Step 2: Preparing and Shaping the Jersey
A jersey straight out of a shipping box or a drawer will look slouchy, wrinkled, and unappealing inside a frame. Proper preparation ensures crisp lines and a commanding visual presence.
1: Remove Wrinkles Safely
Lay the jersey flat on a clean ironing board. Set your iron to a low, synthetic-friendly temperature. Always place a clean cotton pressing cloth or parchment paper between the iron and the jersey.
This critical barrier prevents the heat from melting synthetic jersey mesh or smudging the ink signature. Gently steam or press out stubborn creases, paying special attention to the chest area surrounding the autograph.
2: Craft a Custom Support Insert
Jerseys rely on human shoulders and torsos for structure. Inside a frame, gravity will cause an unsupported jersey to sag awkwardly downward.
- Lay your jersey flat on top of an acid-free foam core board.
- Trace the rough outline of the upper torso and shoulders.
- Cut out a U-shape or torso-shaped insert that fits snugly inside the collar and down through the chest.
- Smooth the edges of the cut foam board so they will not catch or fray the interior lining of the fabric.
3: Fold and Position the Sleeves
Depending on the size of your shadow box and your aesthetic preference, you have two choices for the sleeves:
- The Full Display: If your shadow box is exceptionally wide, you can extend the sleeves outward, though this requires a massive frame.
- The Clean Fold (Recommended): Fold the sleeves neatly backward behind the main body or tuck them smoothly toward the sides. Ensure that the primary team logo, numbers, and most importantly, the signature remain entirely visible and centered on the front.
Step 3: Mounting and Securing the Fabric
This is the most delicate phase of the process. Your goal is to secure the jersey immovably while treating the fabric and signature with absolute reverence.
The Golden Rule of Mounting: Zero Adhesives
Never use tape, glue, hot glue, staples, or adhesive sprays directly on the jersey fabric or anywhere near the autograph.
Adhesives break down over time, bleeding through fibers, leaving permanent chemical stains, and ruining the underlying value of the collectible. Everything must be held in place mechanically.
Pinning and Stitching Techniques
- Position the Insert: Slide your custom foam core insert inside the jersey, aligning it so the fabric is taut, smooth, and free of ripples.
- Anchor the Hidden Points: Center the jersey face-down or face-up on your main backing board. Push stainless steel straight pins through hidden structural seams, such as under the armpits, deep inside the collar lining, or along the bottom hemline where the pinheads will be invisible.
- Use Archival Thread for Extra Security: For heavy tackle-twill numbers or thick jerseys that sag under their own weight, weave clear fishing line or color-matched cotton thread around interior seams and anchor them through the back of the foam board. Pull them taut and secure them tightly on the reverse side.
Step 4: Curating Additional Memorabilia and Assembly
A bare jersey looks fantastic, but adding complementary pieces elevates the display from a simple piece of clothing to a curated museum exhibit.
Incorporating Accents
If your shadow box has extra negative space surrounding the jersey, consider framing related elements:
- A crisp 8×10 action photograph of the athlete wearing that exact style of jersey.
- An authentic ticket stub from a memorable game.
- A custom-engraved metallic plaque detailing the player’s career achievements, milestone date, or authentication certification details.
Use archival photo corners or double-sided conservation tape on the mat board surrounding the jersey—never touch the jersey itself with these materials.
Final Assembly and Sealing
Inspect the Interior: Clean the inside of your UV-protective acrylic cover using a non-static, ammonia-free cleaner and a micro-fiber cloth. Any dust or smudges trapped inside will drive you crazy once the frame is sealed.
Insert the Backing: Carefully slide your finished backing board—complete with the mounted jersey and accessories—into the shadow box channel.
Seal the Edges: Secure the backing clips or fasteners. For ultimate preservation, run a strip of acid-free framing tape around the entire outer seam where the backing board meets the frame. This creates an airtight seal that locks out dust, humidity, and micro-insects.
Maintaining Your Framed Masterpiece
Once your autographed jersey is safely mounted and hanging on the wall, minimal maintenance is required to keep it looking pristine for decades:
- Choose the Right Location: Hang your shadow box away from direct, blazing sunlight (such as directly opposite a south-facing window) and away from high-moisture areas like bathrooms or kitchens.
- Control Climate Fluctuations: Keep the display in a climate-controlled room where temperature and humidity levels remain relatively stable.
- Dust Regularly: Gently wipe the exterior acrylic with a soft microfiber cloth. Avoid harsh chemical sprays that could seep into the frame joints.
By taking your time, using conservation-grade materials, and respecting the integrity of the fabric and ink, you create an enduring tribute that celebrates your passion for the game and preserves sports history in style.