Whether you are a seasoned groundskeeper, a high school coach, or a dedicated volunteer prepping the field before a Little League game, properly chalking a baseball diamond is a foundational game-day duty.
Straight, legal boundary lines and crisp batter’s boxes give umpires an accurate visual field, reduce in-game rule disputes, and create a professional playing surface for athletes.
This step-by-step guide walks you through the entire field prep process—from soil smoothing and dimension verification to template layout, manual measurement techniques, and foul line alignment.
Game-Day Timeline & Required Tools
Proper field execution begins well before the first pitch. Rushing the process leads to crooked baselines, oversized batter’s boxes, and chalk spills across the dirt.
The Pre-Game Timing Rule
Home team managers, coaches, or field preppers should plan to arrive at the field at least 30 minutes before players and spectators arrive.
Arriving 30 minutes early ensures you have adequate time to smooth the soil around home plate, line up your templates, anchor string lines, and execute crisp lines without rushing.
If you struggle with walking in a straight line while pushing a line striper, delegate the chalk machine pushing to an assistant coach or volunteer while you handle template placement and string anchoring.
Pre-Game Prep Timeline
- T-45 MIN: Arrive at the field and inspect all equipment.
- T-30 MIN: Rake and smooth the dirt around home plate.
- T-20 MIN: Position the batter’s box template and scribe the outline.
- T-15 MIN: Anchor the string line from the home plate apex to the baseline.
- T-10 MIN: Chalk the batter’s boxes and foul lines.
- T-05 MIN: Clean up the tools and prepare the field for player arrival.
Essential Tool Checklist
Gather all necessary materials before starting work on the dirt:
- Limestone-Based Athletic Field Chalk: Standard, non-caustic ground chalk formulated specifically for sports fields.
- Line Chalker / Striper: Adjustable dispenser set strictly to the 2-inch width setting.
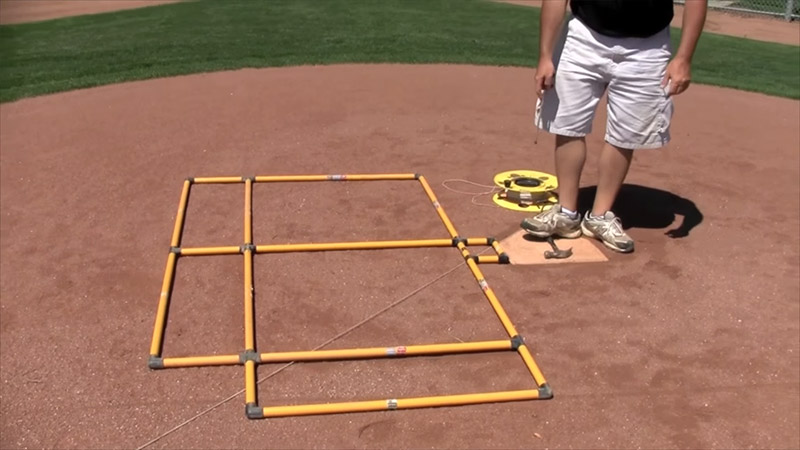
- Batter’s Box Template (Jig): Metal or lightweight PVC folding frame matching your league’s age division.
- String Line & Heavy-Duty Ground Pins: A minimum of 100 feet of durable mason line tied to steel ground stakes.
- Soil Finishing Rakes: A small hand rake for breaking up stubborn dirt clumps and a wide rock rake for flattening the batter’s box area.
- Measuring Tape & Nails: A 50-foot tape measure and long nails for scribing lines when applying manual measurement techniques.
Equipment Availability Tip: Line stripers and batter’s box templates should be stocked in your field’s equipment shed or press box. If you discover that a field is missing its template or line striper, contact your league board immediately to ensure replacement equipment is made available.
Official Dimensions & Rules Quick-Reference

Before marking the ground, confirm the exact boundary dimensions required by your specific league division. Using incorrect dimensions compromises game integrity and can result in legal play disputes.
Official Batter’s Box Sizing Chart
| League / Level | Width | Length | Offset from Home Plate | Line Width Setting |
|---|---|---|---|---|
| Youth Baseball / Little League | 3 Feet | 6 Feet | 6 Inches | 2 Inches |
| Adult Baseball (High School, MLB, Amateur) | 4 Feet | 6 Feet | 6 Inches | 2 Inches |
| Fastpitch & Slowpitch Softball | 3 Feet | 7 Feet | 6 Inches | 2 Inches |
                 PITCHER'S MOUND
                        ▲
                        │
         ┌──────────────┼──────────────┐
         │              │              │
         │   LEFT-HAND  │  RIGHT-HAND  │
         │   BATTER'S   │   BATTER'S   │
         │     BOX      │     BOX      │
         │  (3' x 6' or │  (3' x 6' or │
         │    4' x 6')  │    4' x 6')  │
         │              │              │
         └───────┬──────┼──────┬───────┘
                 │ 6"   │  6"  │
                 │      │      │
                        ▲
                   HOME PLATE
Core Field Marking Rules to Remember
- The 2-Inch Width Rule: Always adjust your line striper to dispense a 2-inch wide line. While 4-inch lines are standard for soccer and football pitches, a 4-inch stripe is too wide for baseball boxes and baselines.
- Fair Territory Alignment: In baseball, the foul lines, first base, third base, and the batter’s boxes reside entirely within fair territory. Any batted ball that settles on or touches the foul line or base is officially fair.
- Home Plate Geometry: In baseball, the black rubber bevel surrounding home plate exists solely as a visual background contrast for umpires and pitchers—it is not part of the playing surface itself. (In softball, the black bevel is considered part of the plate).
Step 1: Soil Preparation & Equipment Setup
Attempting to chalk over uneven, grooved, or heavily compacted clay creates broken lines and inconsistent chalk flow.
- Break Up Hard Dirt: Take a small hand rake and break apart hardened clay mounds, deep cleat ruts, and dirt clumps around home plate left behind from previous games or rain.
- Flatten the Surface: Use a wide rock rake to smooth the surrounding dirt flat across both the left-hand and right-hand batter’s box areas. A smooth dirt surface guarantees that the chalk machine rolls evenly without bouncing or skipping.
- Inspect and Fill the Chalker: Open your line striper hopper and inspect the interior. Break up any consolidated chalk clumps with a stick or nail to prevent clogging the agitator wheel. Fill the hopper with only enough fresh limestone chalk for one field to avoid extra weight and machine strain. Ensure the dispenser lever is fully locked in the “OFF” position before loading.
Step 2: Laying Out the Batter’s Box (Two Approved Methods)
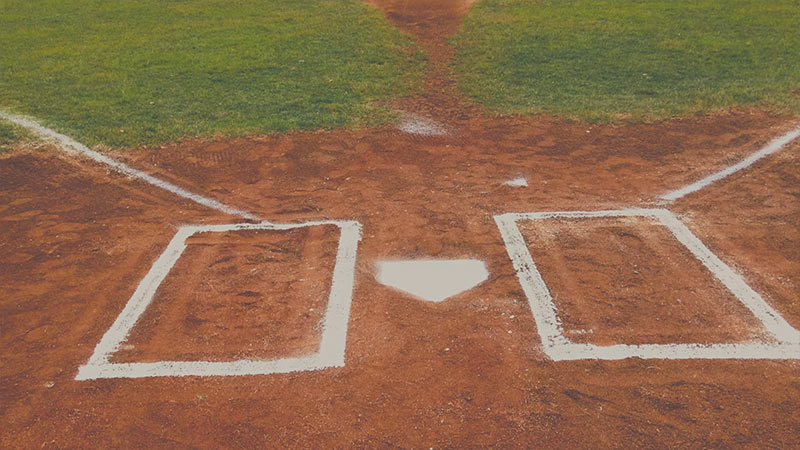
There are two primary ways to establish the box boundaries: using an official metal/PVC template jig (Method A) or using the manual pin-and-tape measure technique (Method B).
                  METHOD A: TEMPLATE ALIGNMENT

                       Pitcher's Mound
                             ▲
                             │ (Directional Arrow)
                   ┌─────────┴─────────┐
                   │  TEMPLATED FRAME  │
                   │                   │
  [Handle/Tab] ───►│ ┌───────────────┐ │
  Flush against    │ │   Home Plate  │ │
  straight side    │ │   White Edge  │ │
                   └─┴───────────────┴─┘
Method A: Using a Batter’s Box Template (Recommended)
Using a pre-fabricated template is the fastest and most reliable way to stencil the hitting area.
- Position the Handle: Place the template flat on the ground on one side of home plate. Locate the alignment handle or tab on the frame and press it flush against the straight parallel side edge of the white portion of home plate.
- Orient Toward the Mound: Verify that the directional arrow stamped on the template frame points straight toward the center of the pitcher’s mound.
- Trace the Outline: Step firmly along all four metal frame edges to press the template into the moist dirt, leaving a deep indentation. Alternatively, run a long nail or screwdriver along the inside perimeter of the frame to scribe a clean line in the dirt.
- Repeat for Opposite Side: Lift the template, flip or move it to the opposite side of home plate, align the tab flush against the opposite straight edge, and scribe the second outline.
Method B: Manual “Old School” Pin & String Layout

If your equipment shed lacks a template, you can manually establish the exact legal 6-inch offset and box outer corners:
                   METHOD B: MANUAL 6-INCH OFFSET

                         Pitcher's Mound
                               ▲
                               │
                       [Front Corner Pin]
                        ▲      │      ▲
             3 Feet     │      │      │     3 Feet
             Forward    │      │      │     Forward
                        │      │      │
  [Outer Pin] ──────────┼──────┼──────┼────────── [Outer Pin]
             (3' Youth /│      │6"    │ (3' Youth /
              4' Adult) │      ▼      │  4' Adult)
  [Rear Pin]  ──────────┼─── [Peg] ───┼────────── [Rear Pin]
                        │             │
                        ▼             ▼
                     3 Feet         3 Feet
                    Backward       Backward
                               ▲
                               │
                        Back Point (Apex)
- Locate the Plate Side-Corner: Find the side-corner of home plate where the straight parallel side meets the angled back point pointing toward the catcher.
- Establish the 6-Inch Offset: Measure exactly 6 inches out perpendicular to home plate’s straight side edge. Push a metal pin into the dirt at this point; this pin marks the exact center point of the inner line.
- Mark Front and Rear Inner Corners: From your center pin, measure 3 feet forward (toward the pitcher’s mound) and place a pin for the front-inner corner. Measure 3 feet backward (toward the catcher) and place a pin for the rear-inner corner. (For softball, measure 3 feet forward and 4 feet backward).
- Square the Outer Corners: From the front-inner pin, measure out perpendicular from home plate 3 feet for youth (or 4 feet for adult baseball) and set your front-outer pin. Repeat this measurement from the rear-inner pin to set the rear-outer pin.
- Scribe the Lines: Connect the pins by dragging a screwdriver or nail along a straight edge to scribe your rectangle outline into the dirt. Repeat on the other side of home plate.
Step 3: Applying the Chalk to the Batter’s Box
Once your outlines are scribed in the dirt, follow these precise chalking techniques to ensure official compliance:
- Set Dispenser Width: Confirm that the chalk machine gate is adjusted strictly to the 2-inch mark.
- Chalk Strictly INSIDE the Marks: Position your chalker wheel directly over your scribed dirt line. Crucial Rule: Always dispense the chalk inside your trace marks. Because the template jig or outer measurement represents the maximum legal limit of the box, chalking on top of or outside the lines will result in an illegal, oversized batter’s box.
- Maintain an Even Pace: Open the lever and push the chalk machine forward smoothly. If the chalk line appears thin or faint, pull the machine backward over the same section a second time to build an even layer.
- Shut Off Gate on Turns: Always lock the dispenser lever “OFF” when turning corners or transitioning between the left and right boxes. Leaving the gate open while turning dumps ugly chalk piles across the home plate dirt.
┌────────────────────────────────────────────────────────────────────────┐
│                        CRITICAL CHALKING RULE                          │
│                                                                        │
│   INCORRECT (Oversized Box)              CORRECT (Legal Dimension)     │
│   =========================              =========================     │
│       │                    │                 │                    │    │
│  ▒▒▒▒▒│▒▒▒▒            ▒▒▒▒│▒▒▒▒        ┌───►│▒▒▒▒            ▒▒▒▒│◄──┐│
│  Chalk applied ON or OUTSIDE line       │    │Chalk applied INSIDE│   ││
│  exceeds official legal size.           │    │scribed outline.    │   ││
│                                         │    │                    │   ││
│                                      Scribed Outline          Scribed Outline
└────────────────────────────────────────────────────────────────────────┘
Step 4: Running Accurate Foul Lines & Baselines
A clean foul line provides umpires with the sharp visual threshold needed to make instantaneous fair/foul rulings on grounders and pop flies.
                     FOUL LINE DISSECTION DETAIL

                            First Base
                                ▲
                                │
                                │  (Taut Mason Line)
                                │
                        ┌───────┼───────┐
                        │ BATTER'S BOX  │
                        │       │       │
                        │       │◄──────┼── Foul Line DISSECTS box
                        │       │       │   (Does not miss corner)
                        └───────┼───────┘
                                │
                                ▼
                       Home Plate Back Apex
                         [Ground Anchor]
- Anchor at the Home Plate Apex: Take a heavy metal ground pin tied to your mason line string and hammer it into the dirt directly behind the back point (apex) of home plate. Keep the string as low to the ground as possible.
- Run String to the Outer Base Edge: Unwind the string line down the baseline toward first base. Pull the string taut and wrap it around the outside edge of the first base bag. Repeat this process down the third-base line, anchoring the string to the outside edge of third base.
- Why Outside Base Alignment? First base and third base reside entirely within fair territory. Aligning the string with the outside edge ensures the entire width of the chalk stripe remains inside fair ground.
- Understand the Dissection Rule: Notice how the taut string line passes through the batter’s box area. The foul line dissects (runs straight through) the batter’s box rather than missing its outer corner. This occurs because home plate and the front portion of the batter’s box both share fair territory.
- Dispense the Line: Position the chalker wheel over the string line. Walk forward steadily from the home plate box area down the baseline. In most amateur and youth settings, chalk lines extend from home plate through the dirt to the edge of the outfield grass. (Chalking all the way to the outfield fence or foul pole is generally reserved for tournament or professional venues).
In-Game Maintenance & Rulebook Specifics
Understanding how boundary lines function during active play helps coaches handle umpire questions and mid-game field issues.
In-Game Re-Chalking Protocol
During the course of a game, batters dig into the dirt, sliding runners spray dirt, and catcher movements gradually erase the white chalk lines.
- Is Re-Chalking Normal? Lines are rarely re-chalked during a standard 9-inning game. Grounds crews occasionally sweep the dirt or rake around bases mid-game, but re-chalking lines during active play is uncommon unless specifically requested by the home plate umpire due to severe weather or extreme line degradation.
The “Out-of-Box” Hitting Rule
The batter’s box defines the legal striking zone for hitters. Under official baseball rules, a batter must keep both feet entirely within the lines of the box when making contact with a pitch.
- Automatic Out: If a batter steps fully out of the box and makes contact with the ball (whether fair or foul), the batter is automatically called out by the umpire.