Make sure to pitch in the same place every time and use a sand or soil mound that is long, narrow, and steep-sided. The ball should be at least 32 inches in circumference for maximum accuracy when throwing it.
Only use a rubber band when you are ready to throw the ball – otherwise you may end up damaging your lawnmower.
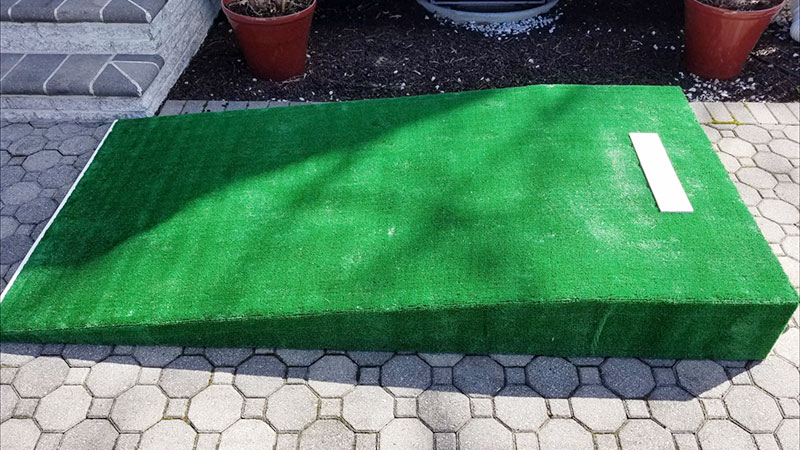
How To Build A Pitching Mound?
Prepping for a backyard game of catch is easier with the right equipment. A sand or soil mound provides an even surface to throw and catches the ball more reliably.
Be sure to use a rubber band when you are ready to play, as this will avoid unnecessary wear on your hands and fingers. Keep in mind that the size of your ball should be at least 32 inches in circumference for optimum gameplay experience.
Finally, pitch where everyone can see it- not behind trees or buildings.
Pitch In The Same Place Every Time
To pitch in the same place every time, use a pitcher and rubber band. Set up your mound before you start pitching by positioning yourself so that the arm of the pitcher is parallel to the ground.
When you throw, make sure that your hand and elbow are stationary throughout the motion for an accurate strike. Do not overspin or curve pitches; this will result in wild swings and less control over where the ball goes next time around.
Practice regularly so that you can perfect your pitching technique.
Use A Sand Or Soil Mound That Is Long, Narrow, And Steep-Sided
For best results, build a mound that is long, narrow, and steep-sided. Use either sand or soil to create the perfect formation. Make sure the mound is level before beginning construction; it will affect your pitch’s accuracy later on.
The height of the mound also affects its effectiveness; make it as high as possible without tipping over. When finished, use a string line to measure your distance from home plate – this will determine how deep you dig your hole.
Make Sure Your Ball Is At Least 32 Inches In Circumference
You need to purchase a ball that is at least 32 inches in circumference. Make sure the ball is inflated and adjusted properly before you start playing.
The mound should be placed on flat ground with plenty of room around it so players have room to run and catch the ball without having to dodge obstacles or people.
To make pitching more challenging, create a wind-screen by folding sheets of newspaper or cardboard several times until they form an aerodynamic shape over your mound.
Finally, make sure there are no obstructions in front of your mound as this will cause balls thrown into it to bounce unpredictably off the surface and away from players.
Only Use A Rubber Band When You Are Ready To Throw The Ball
Use a rubber band when you are ready to throw the ball in order to create more power and accuracy. If your pitching mound isn’t level, use sand or water to adjust it before starting to throw balls.
The height of your mound is important, so make sure you find an appropriate spot for it that’s comfortable for you and allows easy access to the ball. When practicing, always aim for softballs instead of using live pitches in order not to injure yourself or damage your equipment unnecessarily.
Always be sure to take breaks after throwing each pitch in order give your arm a chance to rest and recover between throws.
What is the slope of a pitching mound?
The slope of a pitching mound is the angle at which it rises from its base to the top. It affects how easily balls fall off of it, and how much force they need to bounce when they reach the ground.
- The slope of a pitching mound affects how much ground the pitcher has to cover in order to throw a pitch. The higher the slope, the shorter the distance from home plate to first base and vice versa.
- It is important to note that there are two points on the mound where the slope changes: 60 feet from home plate and 6 feet in front of the pitching rubber (where batters stand). From these two points, the mound slopes downward at 1 inch per foot.
- Any repairs or updates made to a baseball field must be completed by a licensed professional since any alterations can affect gameplay and safety issues for players.
- Since this slope is gradual, it’s hard for hitters to tell when they’re going too far off-base – even if they’re standing right next to second base.
- Keeping your playing area maintained will ensure that everyone enjoys an enjoyable game experience – regardless of their batting skills.
What are the dimensions of a pitching mound?
A pitching mound is a special type of ground that is used to play baseball or softball. The dimensions of a pitching mound are usually about 60 feet long, 20 feet wide and 15 feet high.
The Pitcher’s Mound is 18′ in Diameter
The Table Is 5′ Wide by 34 Inches Deep
Six Inches from the Front Edge of the Table is the Plate (Rubber)
The Rubber Is 6″ Deep and 24″ Wide
From Side to Side, It’s 54 Feet Long
The Table Is 5′ Wide by 34 Inches Deep
This table measures at a width of five feet and a depth of one foot with an area that totals up to fifty four square feet or 0.047 acres. This size would be great for practicing your pitching skills outdoors without having to worry about damaging any trees or plants around you.
Six Inches from the Front Edge of the Table is the Plate (Rubber)
There are six inches between where rubber meets wood, which gives batters something soft to hit when trying to steal bases or get on base during batting practice; this also prevents balls from bouncing off too easily when someone tries swinging at them.
From Side To Side, It’s 54 Feet Long
Lengthwise it stretches out fifty-four feet while Width-wise it measures out at six inches making sure there are no gaps where pitches can go undetected 5. The Rubber Is 6″ Deep and 24″ Wide.
Why is the pitching mound 60 ft 6 in?
There is no one answer to this question – it depends on a lot of factors, including the size and shape of the stadium. In general, though, stadiums are designed with an aiming point at home plate that is 60 ft 6 in (18 m) away from center field.
This allows for fair play between hitters and pitchers as well as accurate throws by defenders.
The Pitching Mound Is 60 ft 6 Inches from Home Plate
The distance from home plate to the pitching mound was set at 60 feet 6 inches in 1885.
At that time, overhanded throws were allowed, so the distance needed to move back was calculated. This is why the pitching mound is located where it is today.
As Overhanded Throws Were Allowed, the Distance Needed to Move Back Was Calculated
Since 1893, there’s been a pitcher’s box at each end of the pitcher’s area – this way pitchers can make all their pitches without having to move too far away from home plate (which would give batters an advantage).
Since 1911, an Artificial Left-hander’s Box has Been Built and Placed Between First and Third Base
In 1911, an artificial left-hander’s box was built so that both righties and lefties could pitch equally well – this change made baseball more even for everyone involved.
There’ve Been Pitcher’s boxes at Each End of the Pitcher’s Area since 1885
How many bags of clay do I need for a pitcher’s mound?
You’ll need enough clay for a pitcher’s mound, so plan accordingly. The harder the clay, the sturdier your mound will be. Use an infield mix to increase productivity and make mixing and shaping easier.
Pre-bake your clays to save time and energy. Create a pitcher’s mound with ease using these tips.
Why is pitching mound raised?
The pitching mound is raised to give pitchers an advantage over hitters. Elevation on the pitcher’s mound decreases the importance of height difference and gains momentum for pitches.
Returning to normal positions restores some advantages that were lost when the pitching mound was elevated in the first place.
What is the white thing behind the pitcher’s mound?
The pitcher’s plate is a white, circular object that sits behind the mound in baseball. It helps keep the ball from going out of play and prevents spectators from jumping into the game.
The plate is made of rubber to protect balls and batters’ hands, as well as prevent scuff marks on them.
How thick is a pitching rubber?
Thickness of a pitching rubber is important for controlling the movement and spin of the ball. Thicker rubbers slow down the ball more, while thinner ones create more spin.
- Thicker pitching rubbers will increase your distance and accuracy when playing the game of baseball. Professional mound clay is typically 4 inches thick for smaller players, 6 inches thick for high school, college and professional players. Play with the right equipment to help you achieve success on the diamond.
- When it comes to pitching rubber, thicker means better. Pitching rubbers that are 2 or 3 inches in thickness can be just fine for most people, but if you’re looking to improve your skills then selecting a heavier rubber may be what you need. A 4 or 5 inch pitch rubber will provide more control and accuracy when throwing strikes on the mound.
- It’s important to use proper equipment when playing baseball so make sure to select a sturdy pitching rubber that matches your skill level. Too thin of a pitch can cause poor ball flight and result in an inability to throw strikes effectively – choose wisely.
- Pitch with enough force so that the ball reaches its destination without being affected by wind drag – this will allow you not only launch balls further but also hit them harder due to less resistance encountered while in flight.
To Recap
Building a pitching mound is an easy way to improve your batting skills and help you hit better pitches. By practicing hitting off of a mound, you will become more confident when facing pitchers in live play.
You can build your own pitching mound using a few supplies from around the house. Start by digging a hole that’s about twice as wide as it is deep, then fill it with fresh earth. Place some bricks or blocks on top of the earth to create an incline, and make sure the surface is level before continuing.
Next, add enough layers of straw Bale to create a soft platform for batting practice. Finally, cover the mound with plastic or tarps to keep out rain and snow during winter months.


