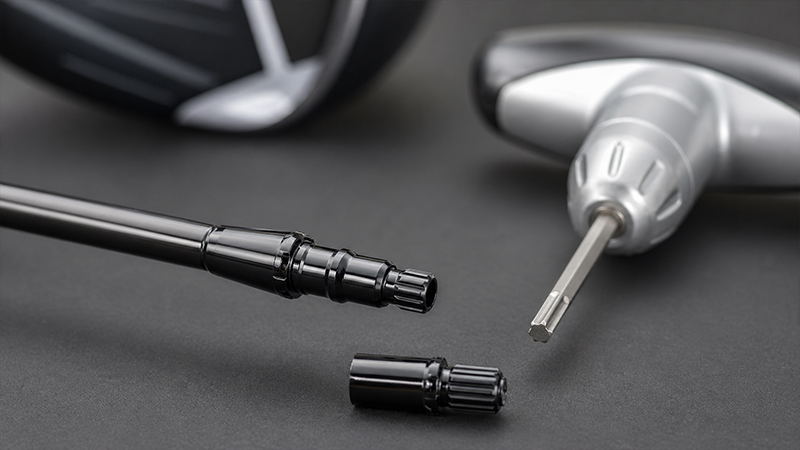
In the high-stakes world of competitive golf, equipment isn’t just a set of tools—it is an extension of the athlete’s biometric profile.
For players utilizing TaylorMade’s industry-leading metalwoods, the ability to swap, upgrade, or experiment with different shaft profiles is a critical component of performance optimization.
However, the barrier to this customization often lies in the precision-engineered bond between the graphite shaft and the metal adapter sleeve.
This comprehensive guide serves as the definitive resource for TaylorMade shaft adapter removal, blending professional-grade methodology with accessible “at-home” solutions.
Whether you are a club-building enthusiast or a performance-driven golfer, understanding the mechanical and thermal limits of your equipment is paramount to maintaining the structural integrity of your investment.
The Science of the Bond
The primary challenge in removing a TaylorMade shaft adapter is overcoming the epoxy bond that secures the sleeve to the shaft tip.
This bond is designed to withstand the violent torque and high-velocity impacts of a 120mph swing; consequently, breaking it requires a controlled application of thermal energy.
The central theme of any successful extraction is precision heat management. To remove the adapter, you must reach the “glass transition temperature” of the epoxy—the point at which it loses its structural rigidity—without reaching the temperature at which the graphite’s internal resin begins to degrade.
Pre-Operation: Tools, Safety, and Preparation
Professional results are rarely the product of improvised tools.
The Essential Toolkit
- TaylorMade Torque Wrench: Required for the initial disassembly of the clubhead from the shaft.
- Thermal Source: A butane torch is preferred for its precision, though a high-powered heat gun is a viable, safer alternative for beginners.
- Extraction Hardware: A professional shaft puller is the gold standard.
- Protection: Heavy-duty work gloves and safety glasses.
- Consumables: Utility knife and a wire hose brush.
Initial Disassembly and Ferrule Preparation
The first step is the mechanical separation of the clubhead. Use the TaylorMade wrench to unscrew the head from the shaft. Once the head is set aside, you will likely encounter a plastic ferrule—the decorative sleeve sitting just above the metal adapter.
The Professional Approach to Ferrule Removal: Do not attempt to pry a cold ferrule. Instead, apply a brief burst of heat (3–5 seconds) from a heat gun to soften the plastic.
Once the ferrule is pliable, use a sharp utility knife to carefully cut it away. This exposes the top of the adapter and ensures that melting plastic does not interfere with the thermal application to the metal sleeve.
Method 1: The Professional Standard (Using a Shaft Puller)
For golfers and builders, who prioritize the use of a professional shaft puller is non-negotiable. This method ensures a straight removal, which is the single most important factor in preventing the splintering of graphite fibers.
Step 1: Securing the Shaft and Adapter
Secure the shaft into the puller’s rubber clamps. A common “pro-tip” used by DIYers and professionals alike is to thread a spare screw and washer into the tip of the adapter.
This provides the puller with a robust mechanical surface to grip, ensuring that the tension is applied directly to the metal sleeve rather than the delicate shaft.
Step 2: The Thermal Application Window
This is the most critical phase. Using your torch or heat gun, apply heat directly to the metal adapter sleeve.
- Duration: 15 to 25 seconds.
- Technique: Stationary heat creates “hot spots” that can permanently damage the shaft’s resin.
- Sensory Cues: Watch for the epoxy to emit a slight “pop” or a distinct chemical scent. This indicates the bond has failed.
Step 3: The Extraction
Once the epoxy has reached its failure point, apply tension using the puller’s mechanical arm. The adapter should slide off in a perfectly straight line.
If there is significant resistance, stop immediately and apply another 5–10 seconds of heat. Never force the puller, as this can lead to catastrophic shaft failure.
Method 2: The At-Home “No-Puller” Alternative
While a puller is recommended, many golfers require a solution that utilizes the tools already in their bag. This method relies on the clubhead itself to provide the necessary leverage for extraction.
The Leverage Technique
- Partial Loosening: Instead of removing the clubhead entirely, back the screw out significantly but keep the head attached to the adapter.
- Focused Heating: Apply heat to the adapter sleeve for approximately 15 seconds, focusing on the area where the shaft enters the metal.
- The Twist and Pull: Once heated, use the driver head as a large handle to twist and pull the adapter off the shaft.
Cautionary Note: This method carries a higher risk profile. Excessive twisting can easily damage the delicate graphite fibers at the tip. If the adapter does not move with moderate force, revert to the thermal stage.
The Boiling Water Hack (The Safest DIY Alternative)
For those concerned about using an open flame near a $400 graphite shaft, the boiling water method offers a low-risk, albeit slower, alternative.
- Submerge the adapter in boiling water for 10 minutes.
- The 212°F (100°C) temperature of boiling water is usually sufficient to soften standard club-building epoxy without ever reaching the threshold of graphite resin damage.
Critical Safety Precautions: Protecting Your Assets
A botched removal can turn a simple customization project into an expensive equipment loss.
1. Avoiding Thermal Degradation
The “glue” that holds a graphite shaft together is a specialized resin. If you apply too much heat, you will “cook” this resin, making the shaft tip brittle and prone to snapping during your next round. Always err on the side of less heat and more patience.
2. The “Straight Pull” Mandate
Graphite is incredibly strong under tension and compression, but it is vulnerable to lateral (sideways) forces. Always pull the adapter straight off. Bending or prying the adapter during removal will almost certainly splinter the tip, rendering the shaft useless.
Immediate Cleanup and Maintenance
A common gap in amateur guides is the failure to address the state of the adapter post-removal. To ensure your next installation is successful, you must perform immediate maintenance.
While the adapter is still warm, the residual epoxy remains in a semi-liquid state. Use a wire brush or a drill bit to scrape out the leftover epoxy from the inside of the hosel.
If you allow the epoxy to cool and re-harden, removing it later will be significantly more difficult and may require harsh chemicals or mechanical grinding that could damage the adapter’s interior dimensions.
Enhanced FAQ: Expert Insights for the Modern Golfer
Q: Can I reuse the adapter after it has been removed?
A: Yes, provided the adapter was not warped by excessive heat or mechanical prying. Proper cleanup of the interior hosel is required before re-installation.
Q: Will removing the adapter void my TaylorMade warranty?
A: Generally, any third-party modification to the original equipment can impact warranty claims. It is always recommended to have a certified TaylorMade technician perform these services if you wish to maintain full warranty protection.
Q: How often should I replace my shaft adapter?
A: Adapters do not typically “wear out,” but the screw threads can become stripped over time. If you notice any play or “wobble” when the head is tightened with the torque wrench, it is time for a replacement.
Conclusion: The Path to Precision Performance
Customizing your TaylorMade equipment is one of the most effective ways to lower your scores and increase your enjoyment of the game.
By mastering the art of shaft adapter removal, you gain the freedom to test the latest shaft technology without the lead times of a professional shop.
Whether you choose the professional shaft puller method or the patient boiling water approach, the keys to success remain the same: controlled heat, a straight pull, and immediate cleanup.