Whether you are dealing with a frustrating internal rattle or need to repair an end cap that has flown off during a high-impact hit, understanding the mechanics of bat end cap removal is a critical skill for serious players and amateur “bat doctors.”
However, this process is far more complex than it appears on the surface, requiring a blend of thermal science, mechanical precision, and specialized chemical knowledge.
This guide explores the comprehensive methods for safely removing an end cap—specifically for high-end models like the 2018 Easton Ghost—while highlighting the legal and structural risks involved.
Understanding the Stakes: Why Remove an End Cap?
The end cap of a baseball or softball bat serves multiple functions: it protects the barrel’s structural integrity, seals the hollow interior, and maintains the bat’s specific swing weight. Players typically seek removal for three reasons:
- Repairing a “Rattle”: Internal debris or adhesive chunks can break loose, creating a distracting sound.
- Replacing a Damaged Cap: High-impact swings can crack or dislodge the cap.
- Restoration: Cleaning out old residue to ensure a better bond for a replacement cap.
A Critical Warning on Legality: Before you begin, you must understand that removing an end cap—even for legitimate repairs—may render the bat illegal for sanctioned league play. If a repair is botched or appears as a modification, you risk being banned from competition.
Essential Tools for End Cap Extraction
To perform a clean extraction without damaging the composite or metal barrel, you will need a specific set of tools:
- Heating Equipment: A heat gun is the preferred choice for controlled application, though a high-powered hair dryer or boiling water can work in a pinch.
- Prying Tools: A flathead screwdriver or specialized prying tools.
- Mechanical Extractors: For stubborn caps, a small bearing puller or a slide hammer is necessary to apply even, outward pressure.
- Cleaning Agents: Acetone is required to strip away old adhesive residue once the cap is off.
- Safety Gear: Gloves to handle the heated barrel and eye protection for when the cap finally releases.
Step-by-Step Removal Methods
The method you choose depends on the stubbornness of the adhesive and the specific model of the bat, such as the 2018 Easton Ghost Fastpitch bat, which is notorious for its tight bond.
The Thermal Softening Technique (Most Common)
Most end caps are held in place by industrial-strength adhesives that become more pliable when heated.
- Apply Heat: Use a heat gun to apply even heat around the edge where the cap meets the barrel for 1 to 2 minutes.
- Monitor Temperature: Avoid excessive heat that could melt the plastic cap or compromise the composite fibers of the barrel.
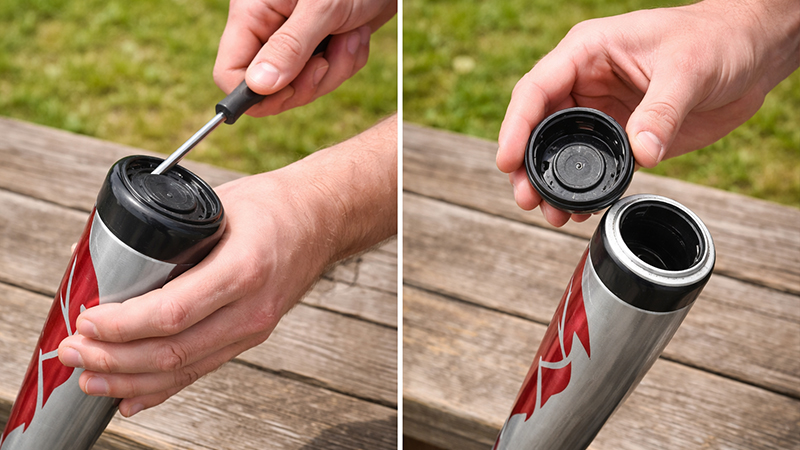
- Pry Gently: Once the glue is softened, use a small flathead screwdriver to gently work the edge of the cap upward.
The Mechanical Extraction
If prying fails, mechanical force is the next step.
- Insert the Puller: Insert a small bearing puller or slide hammer into the center of the cap.
- Expand and Pull: Expand the tool so it grips the underside of the cap and pull it straight out.
- The “Golden Rule”: Never twist the cap. Twisting can break the four internal locking tabs that are essential for keeping the cap seated during a swing.
The Surgical Cut (Last Resort)
When a cap is hopelessly stuck or already damaged, it may need to be removed in pieces.
- The Inner Cut: Use a knife to cut out the inner half of the plastic cap.
- Scrape and Clean: Gradually cut and scrape out the remaining plastic and adhesive until the inner rim of the barrel is completely clean.
Why DIY Adhesives Often Fail: The “Bat Doctor” Insight
A common mistake is using standard hardware store glue to reinstall a cap. Experienced restorers note that there are zero commercial, over-the-shelf products strong enough to hold an end cap in against the extreme forces of a high-velocity swing.
Standard glues lack the necessary flexibility to expand and contract with the barrel in varying temperatures. For a professional-grade bond, you must use specialized materials, often costing over $100, which include multi-step chemical mixing processes.
Reinstallation: The Professional Restoration Process
Once the cap is removed and the barrel is cleaned with acetone, follow these steps for a permanent fix:
- Select a High-Grade Epoxy: Use a two-piece epoxy such as Marine Grade or PC-7.
- Apply and Seat: Apply the epoxy and tap the cap back into place using a mallet.
- Prevent Gas Expansion: Tape the end cap down securely. This prevents internal gas expansion from partially unseating the cap while the glue dries.
- The Weighting Method: Set the bat in direct sunlight, weighted down, for several days to ensure the chemicals bond correctly.
- Clean Residue: Ensure there is no residue left inside (which causes rattles) or outside (which leads to failing visual inspections by officials).
The Reality of Maintenance Costs
Maintaining a bat at a professional level is a significant investment. The specialized chemicals used by “bat doctors” have a very short shelf life—once opened and resealed, they often dry out in about two months and must be tossed.
For players who go through 13 to 16 composite bats a year, balancing the $100 material cost against the $250+ cost of a new bat is a constant financial calculation.
Conclusion: To DIY or Not?
Taking the end cap off a baseball bat is a high-risk, high-reward endeavor. While it allows for the removal of annoying rattles and the repair of dislodged caps, the risk of breaking internal tabs or getting banned for illegal modifications is ever-present.
If you choose to proceed, prioritize even heat application, avoid all twisting motions, and invest in industrial-grade epoxies to ensure your bat remains a safe and effective tool on the diamond.


