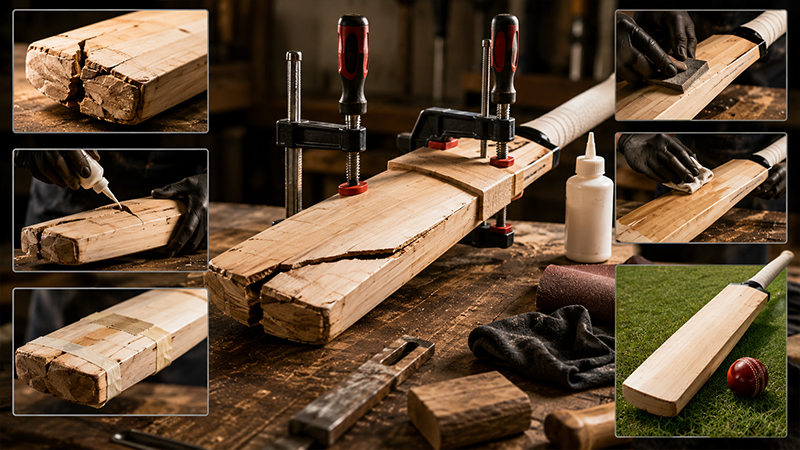
The maintenance of high-performance cricket equipment is a critical discipline for athletes and equipment managers.
A professional-grade English Willow bat represents a significant financial and performance investment. Over time, the structural integrity of the willow is challenged by high-velocity impacts, moisture fluctuation, and surface friction.
This manual provides a methodical framework for cricket bat restoration, ensuring equipment longevity and consistent performance standards.
The Economics and Science of Willow Restoration
Restoring a cricket bat is a strategic decision that prioritizes the preservation of seasoned willow over the immediate procurement of new hardware.
Traditional insights suggest that a well-maintained bat, which has undergone “knocking-in” and seasoning, often performs better than a brand-new alternative due to the compressed fibers and established “sweet spot.”
The primary objective of restoration is to address structural failures—such as edge cracks, handle instability, and toe damage—using materials that align with the natural properties of the wood.
By employing deep-infiltration techniques and flexible adhesives, a player can extend the utility of their equipment by several seasons.
Strategic Preparation: Assessment and Equipment
Before beginning the restoration process, a thorough diagnostic assessment is required. One must distinguish between superficial surface cracks and deep structural fractures that threaten the blade’s stability.
Essential Tooling and Materials
To meet professional restoration standards, the following materials are required:
- Adhesives: High-quality PVA wood glue or Titebond for flexible bonding.
- Cleaning Agents: Fine-grade sandpaper and clean cloths.
- Precision Tools: Syringes or spatulas for glue injection.
- Clamping Systems: Heavy-duty G-clamps or sash clamps.
- Protective Buffers: Wood blocks to prevent clamp indentations on the willow.
- Finishing Supplies: Raw linseed oil, fiberglass tape, and twine.
Step 1: Mending Face and Edge Fractures
The face and edges of the bat are the most frequent points of impact. Cracks in these areas are often caused by “edges” or “yorkers.”
1. Cleaning and Surface Preparation
The initial step involves removing all external attachments, including old grips, anti-scuff sheets, and residual tape.
The damaged area must be sanded to remove dirt and old oils, ensuring the crack is entirely free of debris. This ensures a clean surface for the adhesive to form a molecular bond with the wood fibers.
2. Deep-Infiltration Gluing
Standard surface-applied glue is insufficient for structural repairs. A syringe or thin spatula should be used to inject the adhesive deep into the fracture.
Technical Insight: Glue Selection: The choice of adhesive is critical. While epoxies offer high strength, they are often too brittle for the high-impact nature of cricket.
PVA (Polyvinyl Acetate) wood glue is preferred because it remains slightly flexible after curing. This flexibility allows the repair to absorb the kinetic energy of a ball impact without shattering the bond.
3. Structural Clamping and Curing
Once the adhesive is applied, the crack must be closed using strong clamps. It is imperative to place wood blocks between the clamps and the bat surface to prevent the metal from leaving permanent indentations in the soft willow.
The bat should remain clamped for 24 to 48 hours to allow the adhesive to reach maximum cure strength.
Step 2: Handle Integrity and Socket Repair
The handle is the transmission system of the bat. A loose or clicking handle signifies a failure in the adhesive bond within the splice (the V-shaped joint where the handle meets the blade).
1. Disassembly and Cleaning
If the handle has become unstable, it must be addressed immediately to prevent the blade from splitting. The first step is to clean all old, crystallized glue from both the handle and the blade’s socket.
2. Re-Insertion and Bonding
Apply a generous amount of high-performance wood glue, such as Titebond, to the handle’s splice. Re-insert the handle into the blade. To ensure the handle is fully seated in the socket, use a mallet to tap it securely into place.
3. Stability and Curing
In some instances of extreme instability, professional repairers may use specialized screws for additional stability, though this should be done with caution to avoid splitting the wood.
The handle must be clamped securely and left to dry for at least 48 hours before any further work is performed.
Step 3: Addressing Toe Damage and Moisture Ingress
The toe of the bat is highly susceptible to damage because it frequently comes into contact with the ground and is often exposed to moisture from the pitch.
1. Debris Extraction
Damage at the toe often involves compressed wood fibers and embedded dirt. All dirt and compressed “dead” wood must be cleaned out before repair.
2. Sealing the Damage
Glue the cracks and clamp the toe tightly. Because the toe is a high-impact zone that also absorbs moisture, sealing it is vital.
Once the glue has dried, applying a toe guard or using epoxy/fiberglass tape provides a barrier that prevents future damage and moisture absorption.
Step 4: Refinement, Oiling, and Reinforcement
The final phase of restoration focuses on protecting the wood and reinforcing the repairs.
1. Final Sanding and Surface Leveling
Once all adhesives have cured, the repaired areas should be sanded smooth to ensure a flush finish with the rest of the blade. This prevents localized stress points during ball impact.
2. Nourishing the Willow
Willow is a natural product that requires moisture in the form of oil to remain supple. Apply a light coat of raw linseed oil to the blade.
This prevents the wood from becoming brittle, which is a leading cause of new cracks. Avoid over-oiling the handle or the splice, as this can weaken the adhesive bonds.
3. Structural Binding
For added longevity, the repair area should be reinforced with fiberglass tape or traditional twine binding.
Wrapping the bat in this manner provides a tension layer that helps hold the wood fibers together under the stress of high-velocity impacts.
Evaluating Equipment Lifecycle: Repair vs. Replacement
While most damage can be mitigated through restoration, there are technical thresholds where replacement becomes the more viable option.
- Snapped Handles: If a handle is snapped completely through, it typically requires a professional handle replacement or a new bat.
- Warped Blades: If the willow has warped due to improper storage or extreme moisture, its aerodynamic and structural properties are permanently compromised.
- Extensive Internal Damage: When the core of the willow has lost its “ping” or responsiveness due to age and excessive use, restoration may only provide aesthetic benefits rather than performance recovery.
Frequently Asked Questions (FAQ)
What is the best glue for a cricket bat crack?
PVA wood glue is the industry standard for most face and edge cracks because of its flexibility. For handle repairs, high-strength wood glues like Titebond provide the necessary grip while allowing for the natural vibration of the wood.
How long should I wait before using my bat after a repair?
You must wait at least 24 to 48 hours for the glue to cure while clamped. However, it is recommended to wait an additional 24 hours after removing the clamps before subjecting the bat to high-impact use in the nets.
Can I use superglue for quick fixes?
Superglue (Cyanoacrylate) is generally too brittle for cricket bat repair. Under the stress of a ball impact, superglue bonds tend to shatter. PVA or Titebond are superior choices for long-term durability.
Why is linseed oil important after a repair?
Sanding a bat removes the protective outer layer of wood. Linseed oil nourishes the fibers, maintaining the “suppleness” of the willow and preventing the wood from drying out and becoming prone to further cracking.
Conclusion: Professional Standards for Athletic Success
Maintaining a cricket bat is an essential skill for any serious player. By following these structured protocols—cleaning, precise gluing, extended clamping, and proper reinforcement—you ensure that your equipment remains a reliable extension of your performance on the field.
A methodical approach to restoration not only saves costs but also preserves the unique “feel” of a seasoned piece of willow.