Fitted baseball caps are among the most versatile headwear accessories in modern apparel, serving as iconic fashion statements, athletic gear, and essential sun protection.
However, few experiences are as frustrating as placing a newly acquired cap on your head only to discover that it fits too snugly.
Within an hour of wear, an overly tight sweatband can create uncomfortable pressure points, leading to tension headaches and making your cap feel like a medieval restriction device.
Rather than letting a tight cap collect dust on a shelf or returning a custom order, you can safely enlarge its fit using proven stretching techniques. Many individuals assume that a fitted cap remains permanently locked at its manufactured dimensions.
In reality, by applying the correct combination of controlled tension, moisture, and temperature, you can safely expand a fitted cap by 1/4 to 1/2 of a size (up to an extra quarter-inch) without compromising its structural integrity.
1: Fabric Science — Inspecting Your Cap Before Stretching
Before attempting any stretching technique, you must inspect the inner care tag of your cap to determine its exact material composition. The structural response of headwear to moisture, heat, and physical tension depends heavily on the underlying fabric.
Cotton Twill
Cotton is one of the most flexible and forgiving textiles used in headwear construction. When exposed to light moisture and mild heat, cotton fibers readily relax and expand under tension.
However, because natural cotton fibers retain memory, a stretched cotton cap can experience slight reshrinkage if it becomes heavily saturated with moisture at a later time.
Wool Construction
Traditional pro-style caps often feature authentic wool construction. Wool is naturally pliable and easy to mold. However, wool is exceptionally sensitive to extreme heat. When working with wool caps, you must apply steam or heat gradually to prevent fiber degradation.
Synthetic Polyester & Performance Blends
Modern performance caps—such as those utilizing OTTO T8 Stretchable Polyester Twill, OTTO FLEX, or OTTO COMFY FIT technology—incorporate synthetic fibers engineered with built-in elasticity. While these materials offer superior durability and flexibility, synthetic fibers possess high shape memory.
To permanently reset a polyester blend to a larger circumference, you must apply direct heat or steam to soften the synthetic fibers so they can re-align under tension.
The Pre-Test Rule
Regardless of the fabric, always perform a preliminary test on a small, inconspicuous area of the inner sweatband before applying heat or moisture to the entire cap. This simple precaution ensures that the dye and fabric react favorably without unintentional damage.
2: Step-by-Step Stretching Methods
When attempting to expand a fitted cap, adopt a deliberate, incremental approach. Forcing a cap to stretch too rapidly can cause torn stitching or distorted crown geometry.
Method 1: The Steam Bath Technique (Best for Synthetic Blends, Cotton, and Wool)
Steam penetration is one of the most effective ways to relax dense fabric weave quickly. Steam delivers localized heat and atmospheric moisture into the sweatband without saturating the rigid internal visor structure.
Step 1: Generate Steady Steam
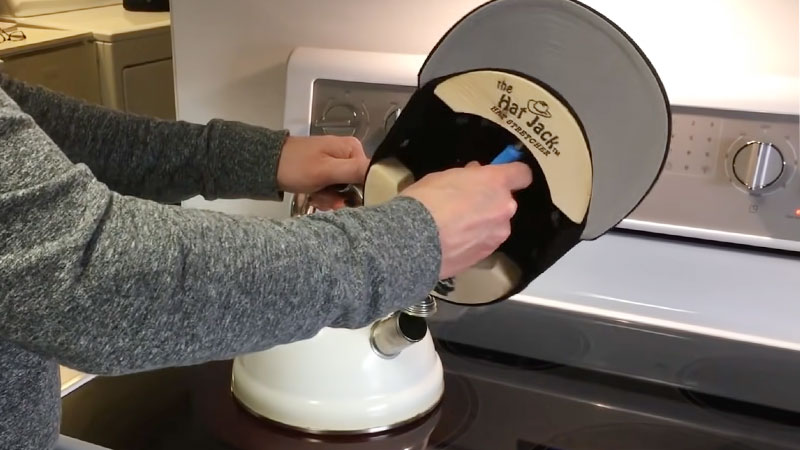
Fill a tea kettle or standard kitchen pot with water and bring it to a rolling boil on your stove to produce a continuous stream of hot steam.
Step 2: Expose the Inner Sweatband
Hold the interior of the cap approximately 6 inches above the steam source. Focus the steam directly onto the inner sweatband and lower crown seam.
Continuously rotate the cap for 30 to 45 seconds to distribute heat and moisture evenly around the band. Exercise extreme caution to keep your hands away from direct steam contact to prevent burns.
Step 3: Apply Immediate Tension
Once the sweatband is hot, damp, and pliable, immediately place the cap onto your head. If your skin is sensitive to heat, allow the fabric to cool for a few seconds until warm to the touch before donning. Alternatively, you can gently pull the warm cap over your knee, applying firm, steady outward pressure.
Step 4: Wear Until Completely Cool and Dry
Keep the cap on your head while it cools and dries completely. As the moisture evaporates and the fibers cool down, the cap locks into the exact dimensions and contour of your head.
Method 2: The Hairdryer and Spray Bottle Technique (Controlled Sweat Method)
For home users seeking a quick, controlled adjustment, combining a fine water spray with hairdryer heating provides excellent precision.
Step 1: Target Moisture Application
Fill a clean spray bottle with lukewarm water. Lightly mist the interior sweatband and the lower crown panels where they join the band. Ensure the fabric is damp to the touch but not dripping wet.
Important Safety Note: Never submerge or soak your entire cap in a basin or wear it into the shower. Fully saturating the brim can warp internal cardboard or plastic visor inserts, leaving the bill permanently floppy or misshapen.
Step 2: Apply Controlled Dry Heat
Set a household hairdryer to a medium-warm temperature setting. Direct the airflow around the dampened inner sweatband for approximately 60 seconds. Keep the hairdryer in constant motion to prevent localized overheating.
Step 3: Mold to Shape
Immediately place the warm, damp cap on your head. Wear it continuously until the fabric has dried completely. The combination of evaporative cooling and physical tension molds the sweatband into your custom head profile.
Method 3: Utilizing a Mechanical Hat Stretcher (Hat Jack)
If you prefer not to wear a damp cap or need to achieve a uniform expansion across the entire band, investing in a mechanical wooden hat stretcher (commonly known as a Hat Jack) is the ideal professional solution.
Step 1: Prepare the Fabric
Lightly mist or steam the interior sweatband and lower crown of the cap to soften the woven fibers.
Step 2: Position the Tool
Insert the Hat Jack inside the crown of the cap. Position the curved wooden blocks so that they rest flat against the front and rear sections of the interior sweatband.
Step 3: Apply Gradual Mechanical Tension
Slowly turn the center threaded screw to expand the wooden blocks outward. Continue turning until the stretcher applies firm, even pressure against the inner band. Avoid over-cranking the tool past the point of initial resistance.
Step 4: Allow to Set
Leave the hat stretcher locked inside the cap for several hours or overnight (up to 24 hours). For stubborn fabrics, you can periodically turn the center screw slightly to increase outward tension incrementally over the drying period.
Method 4: Household Alternative Techniques
If you do not own a mechanical hat stretcher, everyday objects can serve as effective tension tools when used correctly.
The Soccer Ball Technique
A common error when stretching caps over household objects (such as wooden boxes or books) is creating an unnatural “squared-off” crown shape. An inflatable Size 3 or Size 4 soccer ball closely mirrors the natural spherical contour of the human head.
- Lightly mist the interior sweatband with lukewarm water.
- Force the damp cap over a Size 3 or Size 4 soccer ball. Alternatively, insert a slightly deflated soccer ball inside the crown and inflate it using a hand pump until the cap band is under firm tension.
- Allow the cap to sit undisturbed overnight until completely dry. The round profile maintains the natural curved crown of the baseball cap while applying even outward pressure.
The Ice Expansion Freezer Method
Using basic thermodynamic principles, expanding freezing water can apply continuous outward tension to stubborn caps.
- Fill a heavy-duty sealable Ziploc bag halfway with water and press out all excess air before sealing tightly.
- Place the water bag inside the crown of the cap, nesting it securely against the interior sweatband.
- Place the entire assembly into a freezer overnight. As the water turns to ice, it expands outward, applying consistent mechanical pressure against the band.
- Remove from the freezer and allow the ice to thaw slightly before extracting the bag to protect the inner liner from tearing.
3: Essential Precautions to Prevent Cap Damage
While stretching a cap is straightforward, neglecting basic structural precautions can permanently damage your headwear.
1. Protect the Visor and Bill Insert
The visor of a fitted baseball cap relies on an internal stiffener made of reinforced cardboard or molded plastic.
Never submerge the bill in water or expose it to direct steam. Excess heat and moisture can warp the internal structure, turning a crisp flat bill wavy or making a pre-curved visor crooked.
2. Shield Custom Embroidery and Decorating Backings
If your cap features heavy front panel embroidery or custom patch backings, avoid applying direct steam or high heat over the decorated areas. Intense heat can cause the stabilizing backing material behind the embroidery to shrink or pucker, distorting the front logo.
3. Respect Structural Expansion Limits
Stretching techniques are designed to adjust fit by 1/4 to 1/2 of a size. Attempting to force a size Small cap to fit a Large head profile will strain structural seams, resulting in popped thread, distorted panel alignment, and compromised crown symmetry. Always aim for gradual expansion over multiple sessions if significant adjustment is needed.
Maintenance and Proper Storage
Once you have successfully achieved a comfortable fit, proper maintenance ensures your cap retains its expanded size and shape over time.
- Proper Storage: When not in use, store your fitted caps on dedicated hat stands or stuff the crown interior with clean tissue paper. This prevents the crown from collapsing and preserves the sweatband circumference.
- Avoid Uncontrolled Drying: If your cap becomes wet from rainwater or heavy sweat during athletic use, reshape the crown and let it dry naturally at room temperature while resting on a head form or hat stand. Avoid placing wet caps near direct heat vents, which can cause fabric contraction.
Actionable Summary for Cap Resizing
To resize a tight fitted baseball cap safely and effectively, follow this streamlined action plan:
- Check the Fabric Tag: Identify whether your cap is cotton, wool, or synthetic polyester.
- Select Your Method: Use the steam method for poly-blends, the spray-and-hairdryer method for targeted home adjustments, or a mechanical Hat Jack for hands-free expansion.
- Protect the Bill: Focus heat and moisture exclusively on the inner sweatband, keeping the visor completely dry.
- Set Under Tension: Wear the cap until cool and dry or leave it locked on a stretcher/soccer ball overnight.
- Store Properly: Store on a hat stand or stuffed with tissue paper to preserve your custom fit.
By following these structured steps, you can eliminate cap tightness, prevent headaches, and enjoy a perfectly tailored fit on any baseball cap in your collection.