Making a Pitchers Mound out of wood is a fun and easy way to add some extra interest to your backyard. All you need is a few pieces of wood, a drill, and some screws. First, mark the shape of the mound on one piece of wood.
Then, use the drill to make a hole in the middle of that shape. Next, screw the other piece of wood onto the top hole so that it forms an oval shape. Finally, fill the bottom half of the oval with grass or soil and enjoy your new Pitchers Mound!
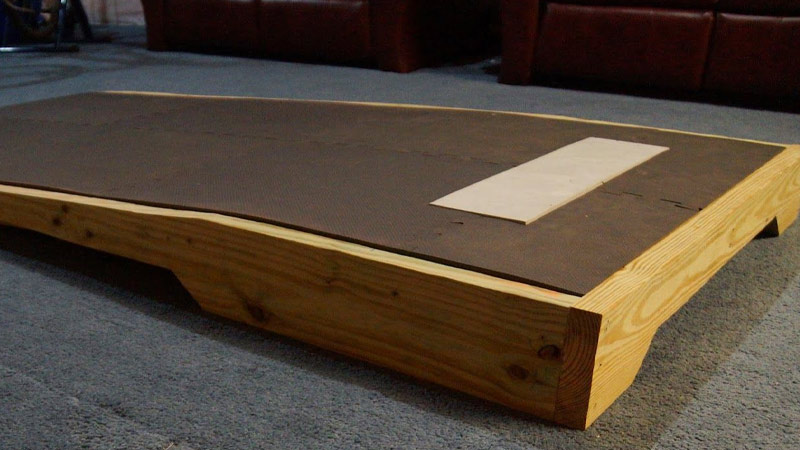
Source: pinterest
How To Make A Pitchers Mound Out Of Wood
Making a pitchers mound out of wood is a fun project that can be done in just a few hours. It is also a great way to teach children how to measure and cut pieces, as well as assemble them correctly.
Simply measure and cut the necessary pieces, then assemble them according to the instructions provided. Once they are assembled, you can fill the mound with dirt or sand. Your pitchers mound is now ready for use!
Measure And Cut The Pieces
If you want to make a pitchers mound out of wood, you first need to measure and cut the pieces. You will need:
-One 8′ x 10′ piece of wood
-One 6′ x 8′ piece of wood
-One 4′ x 6′ piece of wood
-Two 2″ screws
-Two 1.5″ screws
-Paint or a sealant
Measure the Size of Your Pitchers Mound
Before you can start cutting the pieces, you need to measure the size of your mound. This is easiest if you have a model or plan of your pitchers mound in front of you. Once you have measured the size, use the diagrams and instructions below to cut the pieces.
Cut The Pieces To Fit
Once you have measured and cut the pieces, it’s time to fit them together. First, line up one piece along one side of your mound and mark where it should go. Then, use a saw to make the cuts. Be careful not tocut through any of the other pieces that are already fitted together! Next, fit the second piece on top of the first and mark where it should go. Finally, use a saw to make the cuts. Be careful not tocut through any ofthe other pieces that are already fitted together!
Assemble The Pieces Together
Once all the pieces are cut and fit, it’s time to assemble them together. Start by fitting one end of each piece into one ofthe holes in the sides of your mound. Make sure that each end is aligned properly before inserting it further into the hole. Then, use screws or nails to secure each end in place.
Assemble The Pieces
If you want to make a pitchers mound out of wood, you’ll need the following pieces:
-A piece of wood that’s at least 18 inches wide and 30 inches long
-A piece of plywood or another board that’s at least 24 inches wide and 36 inches long
-Plywood or carpeting to cover the surface of the wood
-Ruler or a straight edge
-Tape measure
-Circular saw
-High-grit sandpaper
Get the Right Pieces
The first thing you need to do is gather all of the necessary pieces for your mound. This includes a sturdy piece of wood, some screws and nails, and a drill.
Drill The Hole
Drilling the hole in the wood is important because it will help hold everything together and make sure that the screw and nail can go through easily. Make sure to drill straight into the wood so that your mound stays standing properly.
Assemble The Pieces
Once you have drilled the hole, it’s time to start assembling your mound! Start by putting the sturdy piece of wood on top of the other two pieces, lining up the holes where they meet. Screw in the screws until you’re satisfied with how strong your mound is. Then, use nails to secure it in place.
Enjoy Your Mound Of Wood!
Fill The Mound With Dirt Or Sand
If you’re looking for a fun activity to do with your friends, try making a pitchers mound out of wood. First, find a sturdy piece of wood that’s at least 4 feet long and 2 feet wide. Next, use a saw to cut the wood into a circular shape. Finally, fill the hole in the center of the circle with dirt or sand.
- To make a pitchers mound, you will need some dirt or sand. You can use this mixture to fill the mound in order to create a better surface for your pitcher.
- Make sure that the dirt or sand is evenly spread across the top of the mound before you start filling it in. This will help to ensure that your pitcher has a good base of support when he throws the ball.
- Once the dirt or sand has been spread across the top of the mound, you can begin to build up the sides of the mound using more soil or sand until it reaches the desired height and width.
- Once you have finished building up the sides of the mound, you can finish filling it in with more soil or sand until it is level and solidified.
Choosing The Right Wood
If you want to create a pitchers mound out of wood, you’ll need to choose the right type of wood. You can use either cedar or redwood, but be sure to ask your supplier which is the best option for your project. Cedar is a stronger and more durable wood than redwood, but it will not hold paint or stain as well.
- There are a few things to consider when choosing the right wood for your pitcher’s mound. First, you will want to make sure that the wood is strong and durable enough to hold up to repeated use. Second, you will want to choose a wood that is easy to work with and does not require a lot of specialized tools or skills. Finally, you will want to consider the price and availability of the wood before making your purchase.
- Common materials used for pitchers’ mounds include oak, hickory, maple, cypress, birch, and pine. Each has its own unique features which can make it perfect for specific applications. For example, oak is strong and resistant to moisture damage, while maple is popular because of its light weight and smooth surface finish.
- To create a perfect pitcher’s mound out of wood, start by cutting the pieces necessary using a Sawzall or other appropriate sawing tool. Make sure to adjust the blade depth according to the thickness of the wood being cut in order to avoid gouging or damaging the surface.
- Once all of the pieces have been cut, sand them down using an electric sander if necessary in order to remove any roughness or blemishes. Next, apply a coat of sealant or paint if desired before final finishing touches such as staining or varnishing.
- When choosing wood for your pitcher’s mound, be sure to take into account both its aesthetic qualities as well as its practicality – selecting the right material will ensure that your project comes out looking great and performs just as expected.
How To Joint The Pieces
You can make a pitchers mound out of wood by jointing the pieces together. This will create a sturdy base for your pitcher, and it will be easy to move around.
- Jointing the pieces of wood together is a simple process that will create a perfect pitchers mound. The first step is to cut two pieces of wood that are the same size and shape. Next, you will need to mark the locations of the cuts on both pieces of wood. After making the cuts, it is time to joint them together. To do this, you will need to use a dowel rod or a screwdriver to make small holes in each piece of wood. Once all the holes are made, you can secure the joints with a wooden clamp.
- Jointing wood is an essential skill for anyone who wants to build things like pitchers mounds or furniture. It allows you to create strong and durable objects without having to use heavy machinery or complicated techniques.
- There are many different ways to joint wood, and each has its own advantages and disadvantages. Some popular methods include: hand-jointed construction, veneer lumber construction, L-shape construction, and T-shape construction.
- When jointing wood, it is important to take into account the grain direction of the boards you are working with. This will ensure that your finished product looks correct and stands up over time.
- Jointing wood can be a tedious process, but it is well worth the effort if you want to create quality objects that will last for years
To Recap
If you want to create a pitchers mound out of wood, start by cutting the wood into a desired shape. Next, use a jigsaw or saw to cut the wood into even slices. Finally, sand down the edges of each slice and assemble the mound using screws or nails.