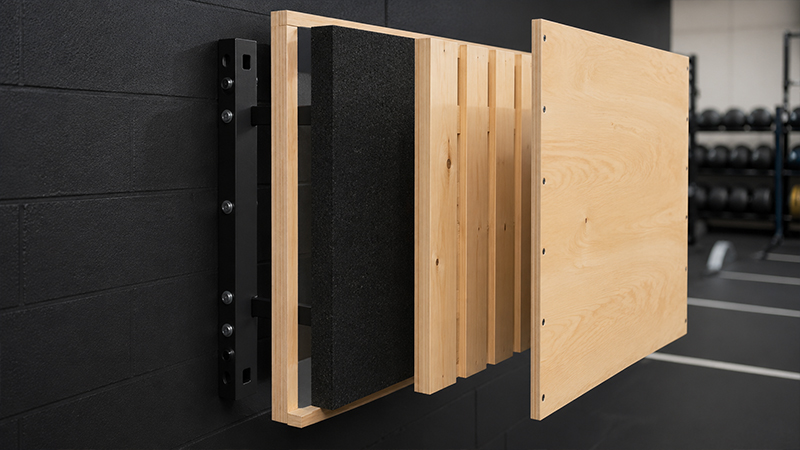
A Driveline-style plyo wall is more than just a piece of wood against a frame; it is a robust, impact-absorbing system designed to protect both the athlete’s equipment and the surrounding structure.
The core philosophy involves using heavy-duty materials like 3/4-inch to 1 1/8-inch plywood and thick rubber surfacing to create a durable, portable throwing surface. By following a specific construction methodology, you can build a wall that mimics the professional setups found in elite training centers.
Essential Materials
To build a Driveline-style plyo wall, you will need the following essential materials and hardware as outlined in the sources:
Primary Construction Materials
- Plywood: You need 1–2 sheets of 3/4″ or 1 1/8″ plywood (standard 4’x8′ size). Thicker plywood is often used to ensure the wall is robust enough to handle high-impact throws.
- Framing Lumber: Use 2×4 or 2×6 lumber to construct the main rectangular frame, the vertical internal studs, and the triangular “A-frame” support legs.
- Impact Surface: A 3/4″ rubber horse stall mat is critical. This surface is essential for absorbing impact and protecting both the wooden structure and the plyo balls from damage.
Hardware and Fasteners
- Construction Screws: Use 3-inch construction screws to secure the plywood to the frame and to attach the rubber mat.
- Washers: These are used in conjunction with the screws to ensure a secure hold, though you should keep them around the perimeter of the wall to avoid direct ball strikes.
Stability and Mobility (Optional but Recommended)
- Anchoring Tools: To prevent the wall from tipping during use, you may need concrete anchors or sandbags to weight the frame down.
- Casters: For a mobile design, heavy-duty locking casters can be attached to the base.
Noise Reduction (Optional)
- Backing Materials: If you need to reduce noise, you can add sound-deadening insulation or a second layer of plywood to the back of the frame.
Would you like me to create an infographic that illustrates the frame dimensions and the “A-frame” support leg assembly for this project?
How To Build A Driveline Plyo Wall
Building a Driveline-style plyo wall allows you to create a professional-grade, impact-absorbing throwing surface designed for high-intensity training.
Whether you are setting up a home gym or a dedicated facility, the following guide outlines the necessary materials and steps to ensure your build is durable and safe.
Step 1: Planning and Dimensions
Before purchasing lumber, you must determine the scale of your project. While a standard DIY mobile design typically utilizes a 4’x8′ sheet of plywood, athletes involved in higher-intensity training often benefit from larger dimensions.
- The Standard Build (4’x8′): Perfect for individual use, garage gyms, and mobility. It provides a sufficient target area for most plyometric drills.
- The High-Intensity Build (Up to 12′ High): For advanced programs or facilities where high-velocity throws require a larger margin for error and more vertical space, scaling the wall up to 12 feet is recommended.
Step 2: Step-by-Step Construction Guide
1. Framing the Foundation
Start by constructing a 4×8-foot rectangular frame using your choice of 2×4 or 2×6 lumber. For maximum stability, add vertical studs every 16 or 24 inches. This internal support ensures the plywood face does not bow or “soften” over time from repeated impacts.
2. Securing the Plywood Core
Lay your plywood sheets over the frame. Use 3-inch construction screws to secure the plywood, ensuring the edges are perfectly flush with the framing. A flush fit prevents vibration and noise during use.
3. Installing the Rubber Face
The rubber stall mat must be cut to match the dimensions of your plywood face. Once sized, bolt or screw the mat directly onto the face of the plywood. This rubber layer acts as the primary shock absorber, deadening the sound of the throw and providing a consistent rebound surface.
4. Engineering for Stability (The A-Frame)
A vertical wall is prone to tipping. To prevent this, build triangular “A-frame” support legs using 2x4s or 2x6s. These legs should allow the wall to stand securely, ideally at a slight angle, which helps the wall stay planted during high-velocity impacts.
Step 3: Optimization and Safety Tips
To elevate your DIY project to a professional standard, consider these “pro-level” adjustments that address common gaps in basic construction guides.
The “No-Screw” Strike Zone
One of the most important safety tips is to avoid placing screws or washers in the center of the wall. If a plyo ball hits a metal fastener directly, it can damage the ball. Keep all fasteners strictly around the perimeter of the wall.
Enhancing Mobility
If you need to move the wall between sessions, attach heavy-duty locking casters to the base. This allows the wall to be portable while remaining rock-solid once the wheels are locked.
Sound Management
High-velocity throws can be loud, especially in indoor settings. To reduce the “boom,” you can add sound-deadening insulation or a second layer of plywood to the back of the frame.
Anchoring for Power
If the wall is not positioned flush against a structural wall, it must be anchored. Use sandbags over the A-frame legs or concrete anchors to bolt the frame to the floor, preventing the wall from tipping forward or sliding backward.
Conclusion: Built to Last
By combining a heavy-duty frame with the specialized impact-absorption of a rubber stall mat, you create a training environment that matches the standards of Driveline Baseball.
This DIY approach not only saves on costs but also allows for a custom build tailored to your specific space and training intensity.
Whether you are building a standard 4’x8′ mobile unit or a massive 12-foot high-intensity station, focusing on perimeter fastening and structural anchoring will ensure your plyo wall remains a staple of your training for years to come.